 07-25-2018, 01:06 PM
|
#16 |
|
Join Date: Jun 2018
Location: Central Florida
Posts: 55
|
Its getting confusing are you talking about the idle jet screw on bottom or the thumb screw on side where you can adjust while idling because your telling me to screw idle jet in to make richer and out leaner.
Also the link here mentions agian "The pilot circuit can be adjusted while the bike is idling and then test run. If the engine is running poorly just off of idle, the pilot jet screw can be turned in or out to change the air-fuel mixture. If the screw is in the back of the carburetor, screwing it out will lean the mixture while screwing it in will richen it. If the adjustment screw is in the front of the carburetor, it will be the opposite. If turning the screw between one and two and a half doesn't have any affect, the pilot jet will have to be replaced with either a larger or smaller one. While adjusting the pilot screw, turn it 1/4 turn at a time and test run the bike between adjustments. Adjust the pilot circuit until the motorcycle runs cleanly off of idle with no hesitations or bogs." But in the pic the pilot jet/slow jet is inside of the carb so how can one adjust while bike is idling. understand my confusion. i know some people call parts different names maybe this what is happening. and also i didnt know you could back out the pilot/slow jet i thought it is tightened down snuggly
__________________
----------------------------------------------------- "Take it easy, if its easy take it twice" 2015 CSC TT250 -Ebay exhaust -Exhaust wrap -Wingsmoto Air bent filter (POD) -Outerwears prefilter for POD -CSC jets 115 and 40 -15 weight front fork oil -47 tooth JTR269.47 rear sprocket -JT 428 HDR (128 link) Heavy Duty Drive Chain -LED tail light bulb -Auxbeam LEDF-S2 headlight bulb -Brush hand guards -30L removable tail box (ebay) -3.1amp waterproof usb charger |

|
|
07-25-2018, 01:28 PM
|
#17 |

Join Date: Jul 2018
Posts: 212
|
Good photo - that makes it easy to see what you're talking about. In the case of that mixture screw on the bottom (mis-read on my part, I thought you were talking about the idle adjustment on the side of the carb), it's the same deal. Turn in, make it richer, turning it out leans the mixture when idling. The same principle applies to both of those screws. There may be some mix-ups in terminology within that article. The photo above also is not a Mikuni carb - I believe that's the China version which comes OEM on the Hawk and other China bikes (IIRC).
__________________
2018 RPS Hawk 250cc Mods so far: 1. Mikuni VM26 Carburetor w/#115 main jet 2. 17T/45T JT sprockets 3. JT 428 X-ring chain 4. Air box mod 5. Hawk Digital Cluster 6. Aftermarket IMS shift lever 7. Performance Aftermarket Exhaust 8. 295mm Nitrogen Gas Monoshock, 20W oil front forks |
|
|
|
07-25-2018, 09:25 PM
|
#18 |
|
Join Date: Jun 2018
Location: Central Florida
Posts: 55
|
The pic is straight from the CSC website for the tt250 carb maintenance tutorial. Their service tutorials are very detailed with pictures and descriptions. a great source of info not just for tt250 owners but alot can be translated to hawk owners also
__________________
----------------------------------------------------- "Take it easy, if its easy take it twice" 2015 CSC TT250 -Ebay exhaust -Exhaust wrap -Wingsmoto Air bent filter (POD) -Outerwears prefilter for POD -CSC jets 115 and 40 -15 weight front fork oil -47 tooth JTR269.47 rear sprocket -JT 428 HDR (128 link) Heavy Duty Drive Chain -LED tail light bulb -Auxbeam LEDF-S2 headlight bulb -Brush hand guards -30L removable tail box (ebay) -3.1amp waterproof usb charger |
|
|
|
07-25-2018, 11:50 PM
|
#19 | |

Join Date: Jun 2016
Location: akwesasne, NY-13655
Posts: 2,220
|
Quote:
|
|
|
|
|
07-26-2018, 08:15 AM
|
#20 |
|
Join Date: Jul 2018
Posts: 212
|
Regarding the performance exhaust - does anyone have issues with that large aluminum muffler rubbing the rear tire when riding rougher terrain? I've noticed some minor tire scrapes on it and it does hang about 4" above the rear tire, so not much clearance.
__________________
2018 RPS Hawk 250cc Mods so far: 1. Mikuni VM26 Carburetor w/#115 main jet 2. 17T/45T JT sprockets 3. JT 428 X-ring chain 4. Air box mod 5. Hawk Digital Cluster 6. Aftermarket IMS shift lever 7. Performance Aftermarket Exhaust 8. 295mm Nitrogen Gas Monoshock, 20W oil front forks |
|
|
|
07-26-2018, 11:46 AM
|
#21 |

Join Date: Mar 2009
Location: Sardis, BC, Canada
Posts: 25,977
|
Appel, some terminologies I use with Mikuni and Keihin carbs used on our China bikes might help.
The idle screw is on the right side of the carb (from the rider's perspective), and it directly engages the slide. Examine the slide, and you'll find a small ramp at the bottom, which lines up with the idle screw. As you screw the idle screw in, you're lifting the slide, just as if you were turning the throttle by hand. It's that simple. The pilot mixture screw is on the bottom of the carb, at the engine end (referred to as the front). This screw is responsible for the transition from the slow jet (which some refer to as an idle jet) to the main jet. Some bikes (like two strokes) have this screw at the back of the carb (at the air filter end), so they will work in the opposite fashion. In general terms, a four stroke carb pilot mixture screw controls fuel, whereas a two stroke carb pilot mixture screw controls air. The slow jet is the smallest of the two removable jets within the carb bowl. They are not adjustable, but they are replaceable. If you're adventurous, you can drill them out. The main jet is the remaining removable jet within the bowl. It is also not adjustable, but it is replaceable. I routinely drill them, rather than buying replacements; I am a cheap China Rider, after all. Some four stroke carbs (Mikuni, for example) have up to five grooves in the jet needle, which is found within the slider. Moving the clip up or down to a different groove with affect how rich or lean the transition is from about 1/4 to 3/4 throttle. I hope that's helpful. Feel free to ask questions for further clarification.
__________________
Weldangrind "I figure I'm well-prepared for coping with a bike that comes from the factory with unresolved issues and that rewards the self-reliant owner." - Buccaneer |
|
|
|
07-27-2018, 11:00 AM
|
#22 |
|
Join Date: Jul 2018
Posts: 212
|
Here's another good informative video explaining idle mixture on a carb...
__________________
2018 RPS Hawk 250cc Mods so far: 1. Mikuni VM26 Carburetor w/#115 main jet 2. 17T/45T JT sprockets 3. JT 428 X-ring chain 4. Air box mod 5. Hawk Digital Cluster 6. Aftermarket IMS shift lever 7. Performance Aftermarket Exhaust 8. 295mm Nitrogen Gas Monoshock, 20W oil front forks |
|
|
|
08-03-2018, 09:34 PM
|
#23 |
|
Join Date: Jul 2018
Posts: 212
|
For those of you who have done the exhaust mod or are thinking about installing a performance exhaust, just some notes about the positioning of the muffler. The aftermarket muffler is substantially larger than the stock version, so it's important to bolt it as high up and to the RIGHT (as you're facing the front of the Hawk) as possible.
To accomplish this I used a 3/4" stainless connector bolt as a spacer (the bolt I used was smaller in diameter so it just went right through it), and a 2" bolt with a nylock nut to secure it to the frame. The aftermarket muffler bracket doesn't end up as far back as the stock muffler bracket, so I drilled an extra hole in the frame to accommodate it. The other issue is that the aftermarket muffler will rub the rear tire when the rear shock compresses over bumps when off-roading (I usually stand up on the pegs when off-roading so only rarely has the rear tire scraped the muffler) if you don't use a large enough spacer. Not a huge issue but you'll end up with some tire scrapes driving over larger bumps if the muffler is too low or not far enough right. Additionally, you'll melt the rear fender if the muffler isn't spaced away from the frame. I took some photos to show how it looks...you can see that the muffler bracket is more or less aligned with the stock muffler hole (unused now). The 3rd photo shows the CSC body panel which fits on with no issues or modification necessary.  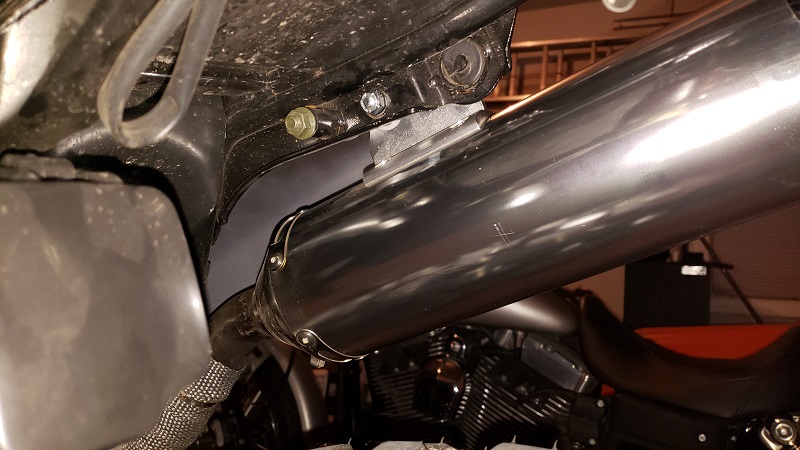 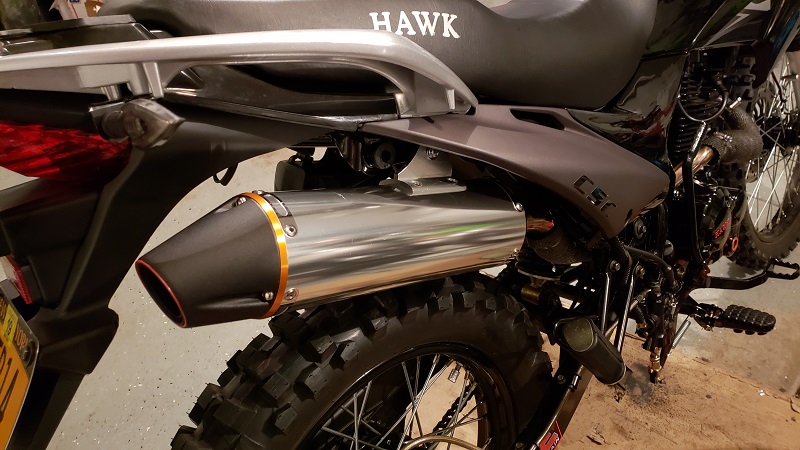
__________________
2018 RPS Hawk 250cc Mods so far: 1. Mikuni VM26 Carburetor w/#115 main jet 2. 17T/45T JT sprockets 3. JT 428 X-ring chain 4. Air box mod 5. Hawk Digital Cluster 6. Aftermarket IMS shift lever 7. Performance Aftermarket Exhaust 8. 295mm Nitrogen Gas Monoshock, 20W oil front forks |
|
|
|
08-03-2018, 11:20 PM
|
#24 |

Join Date: May 2017
Location: Michigan
Posts: 107
|
tt 250 tire rub
try going from the stock 4.60 / 18 to a 4.50/18 tire they are a bit harder to come by but it solved the exhaust rub problem on my 2018 tt250
__________________
04 flywing 150 05 flywing 150 07 gasgas ec200 18 csc tt250 / foam filter mod, amazon exhaust, mikunki carb, 47tooth sprocket, o ring chain, stereo system, amsoil oil, honda 10w fork oil, tusk bars and brush guards.... more to come |
|
|
|
08-04-2018, 09:04 PM
|
#25 |

Join Date: Dec 2016
Location: Western PA
Posts: 363
|
There's a lot of confusion about the screw. On the VM26 clone it controls fuel rather than air.
Generally speaking if the screw is on the airbox side it controls air, if it's on the engine side it controls fuel. So, counter-clockwise = richer mixture. |
|
|
|
01-06-2022, 11:29 AM
|
#26 |
|
Join Date: Dec 2021
Posts: 1
|
Aftermarket exhaust installation issues
For some reason I can’t get my exhaust to fit right without it pressing up against the clutch lever on the engine.
|
|
|
|
01-06-2022, 11:55 AM
|
#27 | |
|
Moderator

Join Date: Oct 2016
Location: Houma, La.
Posts: 11,562
|
Quote:
__________________
2023 Lifan Lycan 250 Chopper 2023 Venom Evader 2022 Lifan KPX250 2020 Kawasaki Vulcan S 2004 Honda ST 1300 2016 Black Hawk 250 (sold) Keihin PE30 carb,125 main,38 slow.Pod filter,ported & decked head 10:1 CR,Direct Ignition Coil,15/40Sprockets,NGK DPR8EIX-9,De-Cat,Dual Oil Cooler,Digital Cluster 2016 Cazador180 XL 2014 Coolster150 JerryHawk250.com My YouTube Channel |
|
|
|
|
01-06-2022, 12:34 PM
|
#28 |
|
Join Date: Jul 2021
Location: Georgia, USA
Posts: 91
|
If you don't want to deal with the flange modification, buy this one. It's a bit more money but bolts right on...
https://carcustomonline.com/direct-b...al-sport-bike/ |
|
|
|
01-06-2022, 06:53 PM
|
#29 |
|
Join Date: Dec 2019
Posts: 77
|
I used a heat gun to soften my airbox and reshaped the lower corner of it to clear my exhaust
|
|
|
|
|

|
 |
|
|


 Linear Mode

