 05-10-2018, 03:43 PM
|
#91 | |
|
Join Date: Feb 2016
Posts: 113
|
Quote:

|
|

|
|
05-10-2018, 08:30 PM
|
#93 | |
|
Join Date: Feb 2016
Posts: 113
|
Quote:
|
|
|
|
|
05-10-2018, 08:40 PM
|
#94 | |
|
Join Date: Feb 2016
Posts: 113
|
Quote:
|
|
|
|
|
05-11-2018, 10:41 AM
|
#95 | |

Join Date: Aug 2017
Location: Bay Area, CA
Posts: 375
|
Quote:
I was able to get most of the ATV done last night, as well as getting the battery charged. I just need to change the brake line routing a little bit, install the front grill, front rack, change the oil/brake fluid, then I'll be done. When I powered up the display, I am showing MPH. I will get a picture up tonight or tomorrow showing the back of the circuit board 
|
|
|
|
|
05-11-2018, 03:21 PM
|
#96 | |
|
Join Date: Feb 2016
Posts: 113
|
Quote:

|
|
|
|
|
05-13-2018, 06:50 AM
|
#98 |
|
Join Date: Feb 2016
Posts: 113
|
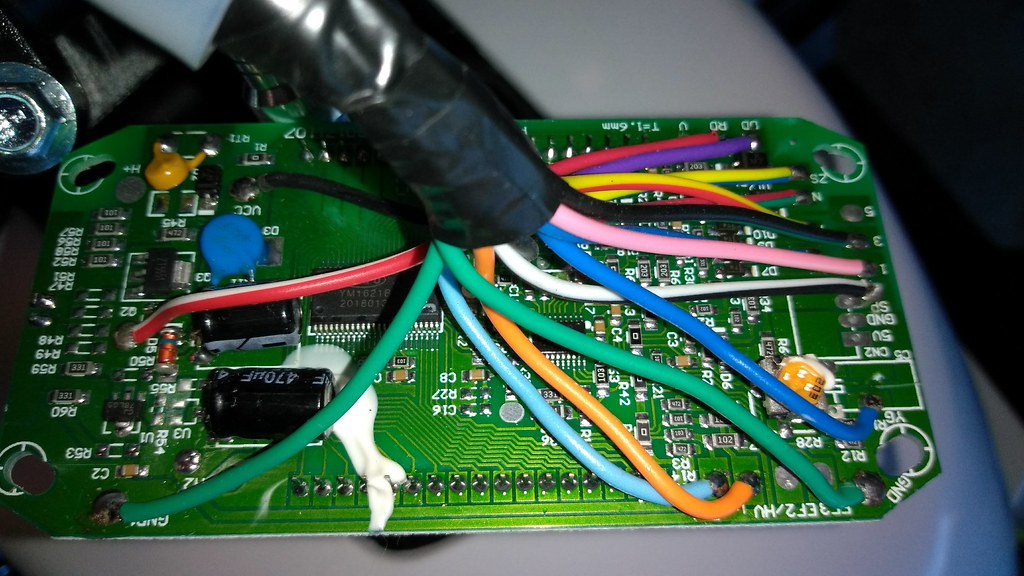
Thanks a million for taking those photos Douglas. Nice of you to do that since there is no issue with your speedometer. So thanks for helping a brother out.
After comparing your board to mine...I can't see any difference in wire configuration. However I do notice that my board is PSO4437A and your board is a PSO4437B. So my guess would be yours has some different diode/capicitor configuration there somewhere that makes yours different then mine. I think my best bet is going to be to order a new board if they ever become available if I ever want my display to read mph. Otherwise just have to learn to calculate the conversion in my pea sized brain. lol Thanks again!
|
|
|
|
05-13-2018, 07:37 AM
|
#99 | |
|
Moderator

Join Date: Oct 2016
Location: Houma, La.
Posts: 11,710
|
Quote:
__________________
2024 Linhai 300 ATV 4x4 2023 Lifan Lycan 250 Chopper 2023 Venom Evader 2022 Lifan KPX250 2020 Kawasaki Vulcan S (Sold) 2004 Honda ST 1300 2016 Black Hawk 250 (sold) Keihin PE30 carb,125 main,38 slow.Pod filter,ported & decked head 10:1 CR,Direct Ignition Coil,15/40Sprockets,NGK DPR8EIX-9,De-Cat,Dual Oil Cooler,Digital Cluster 2016 Cazador180 XL 2014 Coolster150 JerryHawk250.com My YouTube Channel |
|
|
|
|
05-13-2018, 08:42 AM
|
#100 |

Join Date: Apr 2016
Location: MD
Posts: 558
|
Do either of you have a picture of the other side of the board?
I think there might be a jumper or jumped soldered/un-soldered position to enable/disable MPH. It doesn't make sense to have two separate boards for MPH/KM/H. There has to be a function on the board to select either. Even the method of calculating distance would need some sort of way of calibration for how many revolutions = set distance to compensate for different sized tires (circumference) Just whatever you do.....DON'T mess with that yellow trim pot. If you do you might need a spectrum analyzer to get it set right again otherwise the board will be useless. It's glued to it's setting for a reason. It will be something as simple as touching two wires.... something any grunt on the assembly line can handle with no skill. Still would call TaoTao customer support on this one. I really doubt you are the only one with this question. |
|
|
|
05-13-2018, 10:07 AM
|
#101 | |||
|
Join Date: Aug 2017
Location: Bay Area, CA
Posts: 375
|
Quote:
Quote:
https://partskit.com/#/product/searc...n=ATVs&vc=0586 Quote:
I do have a question, When I was draining the assembly oil from the engine I found two plugs under the front of the engine. Drained those, but I found a third small drain plug in the back under what I believe is the gear box. I loosened the plug a little so I was able to get a little fluid out, and it is actual oil (different from the engine oil). Is the fill plug under the plastic side cover on the left side? I was going to remove it to check, but there is a gasket between the block, and the cover. I didn't want to risk tearing the gasket. |
|||
|
|
|
05-13-2018, 12:12 PM
|
#102 |
|
Join Date: Feb 2016
Posts: 113
|
The plug under the gear case is gear case oil. I drained mine and put in new 80/90w gear lube. I filled mine from the bottom. Just stick the tip in there and squeeze till you see a bit come into top vent line.
|
|
|
|
05-13-2018, 12:46 PM
|
#103 | |
|
Join Date: Aug 2017
Location: Bay Area, CA
Posts: 375
|
Quote:
I pulled the display again, I do not see anything on the front of the board that looks like it would change the display. Your board and mind are slightly different, and one of the wires are a different color. I think the display powers up, shows all the options it can display. I think they must have a KPH board, and a MPH board. You could try the dealer to see if you could get a replacement display, or trying TaoTao. I'm also curios to the accuracy of the gauge. I feel it may be displaying a speed faster than what's being ran. We'll see. |
|
|
|
|
05-15-2018, 01:33 AM
|
#104 |
|
Join Date: Aug 2017
Location: Bay Area, CA
Posts: 375
|
I went through the manual, and gave a good look. I do not see where/how to adjust the chain. The only mention of the chain is in the inspection/maintenance section. I just says when to clean, inspect, lube, and adjust the chain. I would like to buy a new o ring chain, but not sure what to expect being that I don't see how to adjust the slack.
|
|
|
|
05-15-2018, 08:13 AM
|
#105 |

Join Date: Feb 2018
Location: nashville
Posts: 574
|
out of the box ready
i got a good one.
only gripe i had upon assembly was that one of the rear tires wouldn't hold air. a very slow leak that ended up being glue of some sort in one spot on the outside bead of tire/wheel. i let the air out, knocked off the glue and it now holds air. this is my first atv, so i really don't have much to compare to. i like it. not one blemish! Attachment 12985 Attachment 12986 Attachment 12987 Attachment 12988 Attachment 12989 Last edited by imapdog; 02-14-2020 at 08:47 AM. |
|
|
|
|

|
 |
|
|


 Linear Mode

