 08-17-2015, 01:00 AM
|
#1 |

Join Date: Sep 2014
Location: Arvada, CO
Posts: 1,004
|
How to install your 13T sprocket
I installed my 13T countershaft sprocket today, replacing the stock 14T sprocket. This is a great way to widen the powerband of the engine and make your gearing more usable, especially on hills. It also gives you a usable 6th gear.
The swap was very easy, even though I had never done it before. Tools Needed
__________________
Red 5 standing by! 2015 CSC red RX3 with 19" front wheel, Shinko 804/805, skid plate, tall seat, 13T/45T sprockets, progressive shock, Winyoochanok windshield, GENSSI LED headlight, SW-Motech tankbag, Shorai Lithium battery 2014 Ural Patrol Last edited by detours; 08-17-2015 at 02:37 AM. |

|
|
08-17-2015, 01:03 AM
|
#2 |
|
Join Date: Sep 2014
Location: Arvada, CO
Posts: 1,004
|
First, lift the rear tire using a paddock stand or centerstand. This paddock stand from Harbor Freight was cheap and works great.
You can do the whole job on the side stand if you want, but this will give you a little more room, while keeping the bike very stable.
__________________
Red 5 standing by! 2015 CSC red RX3 with 19" front wheel, Shinko 804/805, skid plate, tall seat, 13T/45T sprockets, progressive shock, Winyoochanok windshield, GENSSI LED headlight, SW-Motech tankbag, Shorai Lithium battery 2014 Ural Patrol Last edited by detours; 08-17-2015 at 02:21 AM. |
|
|
|
08-17-2015, 01:05 AM
|
#3 |
|
Join Date: Sep 2014
Location: Arvada, CO
Posts: 1,004
|
Remove the countershaft sprocket cover on the left side of the bike by removing two 8mm bolts.
__________________
Red 5 standing by! 2015 CSC red RX3 with 19" front wheel, Shinko 804/805, skid plate, tall seat, 13T/45T sprockets, progressive shock, Winyoochanok windshield, GENSSI LED headlight, SW-Motech tankbag, Shorai Lithium battery 2014 Ural Patrol |
|
|
|
08-17-2015, 01:13 AM
|
#4 |
|
Join Date: Sep 2014
Location: Arvada, CO
Posts: 1,004
|
The countershaft sprocket is secured by a 30mm nut. The nut has a safety washer bent over one edge.
Using a large flat-bladed screwdriver, bend the safety washer until it is nearly flat. You can use a socket extension or other blunt tool to flatten it, but be careful not to damage the washer. You need to reuse it to install your new sprocket.
__________________
Red 5 standing by! 2015 CSC red RX3 with 19" front wheel, Shinko 804/805, skid plate, tall seat, 13T/45T sprockets, progressive shock, Winyoochanok windshield, GENSSI LED headlight, SW-Motech tankbag, Shorai Lithium battery 2014 Ural Patrol |
|
|
|
08-17-2015, 01:16 AM
|
#5 |
|
Join Date: Sep 2014
Location: Arvada, CO
Posts: 1,004
|
Make sure the bike is in gear. If in neutral, you will just turn the wheel.
Using a 30mm socket wrench with a short extension, remove the countershaft sprocket retaining nut. Then remove the safety washer.
__________________
Red 5 standing by! 2015 CSC red RX3 with 19" front wheel, Shinko 804/805, skid plate, tall seat, 13T/45T sprockets, progressive shock, Winyoochanok windshield, GENSSI LED headlight, SW-Motech tankbag, Shorai Lithium battery 2014 Ural Patrol |
|
|
|
08-17-2015, 01:20 AM
|
#6 |
|
Join Date: Sep 2014
Location: Arvada, CO
Posts: 1,004
|
Gently pull the sprocket and chain off the countershaft spindle. It should slide easy away from the engine.
Once it's off the spindle, hold the chain above the sprocket to create slack and gently work the sprocket out of the chain. There should be room to remove it without removing the chain guard or moving the rear wheel.
__________________
Red 5 standing by! 2015 CSC red RX3 with 19" front wheel, Shinko 804/805, skid plate, tall seat, 13T/45T sprockets, progressive shock, Winyoochanok windshield, GENSSI LED headlight, SW-Motech tankbag, Shorai Lithium battery 2014 Ural Patrol Last edited by detours; 08-17-2015 at 02:27 AM. |
|
|
|
08-17-2015, 01:24 AM
|
#7 |
|
Join Date: Sep 2014
Location: Arvada, CO
Posts: 1,004
|
Here is a shot of both sprockets for comparison. The 13T is smaller, which will put slack in your chain.
You can see a raised flange on each socket. This flange MUST face the engine to give the chain room on the other side. Holding the top of the chain above the countershaft spindle, face the flange of the sprocket toward the engine. Then thread the teeth of the 13T sprocket into the chain. Slide the sprocket onto the spindle. In order to line up the splines, you have have to rotate it a little.
__________________
Red 5 standing by! 2015 CSC red RX3 with 19" front wheel, Shinko 804/805, skid plate, tall seat, 13T/45T sprockets, progressive shock, Winyoochanok windshield, GENSSI LED headlight, SW-Motech tankbag, Shorai Lithium battery 2014 Ural Patrol |
|
|
|
08-17-2015, 01:34 AM
|
#8 |
|
Join Date: Sep 2014
Location: Arvada, CO
Posts: 1,004
|
Replace the safety washer by aligning the metal piece into the sprocket hole.
Finger tighten the 30mm nut. Then tighten it firmly with your socket wrench until a flat edge lines up with the bent part of the washer. Use a large flathead screwdriver to bend the side of the washer over the flat of the nut. Now replace the countershaft sprocket cover and snug the 8mm bolts. IMPORTANT: Recheck the countershaft sprocket nut and safety washer after your next ride. The nut is expected to loosen a bit, but the safety washer should remain firmly in place.
__________________
Red 5 standing by! 2015 CSC red RX3 with 19" front wheel, Shinko 804/805, skid plate, tall seat, 13T/45T sprockets, progressive shock, Winyoochanok windshield, GENSSI LED headlight, SW-Motech tankbag, Shorai Lithium battery 2014 Ural Patrol Last edited by detours; 08-21-2015 at 01:44 PM. |
|
|
|
08-17-2015, 01:41 AM
|
#9 |
|
Join Date: Sep 2014
Location: Arvada, CO
Posts: 1,004
|
Congratulations, you just installed a sprocket!
But you're not done yet! The smaller sprocket put too much slack in the chain and you need to tighten it up. Take the bike off the paddock stand (or centerstand). It should be resting on the side stand when testing chain tension. With an 18mm socket wrench, loosen the axle bolt. You may need to brace the axle nut on the other side with a 19mm wrench. The axle MUST be loose enough to slide backwards on the swingarm or you will strip the threads of the tension adjustment bolts.
__________________
Red 5 standing by! 2015 CSC red RX3 with 19" front wheel, Shinko 804/805, skid plate, tall seat, 13T/45T sprockets, progressive shock, Winyoochanok windshield, GENSSI LED headlight, SW-Motech tankbag, Shorai Lithium battery 2014 Ural Patrol Last edited by detours; 08-17-2015 at 02:57 AM. |
|
|
|
08-17-2015, 01:57 AM
|
#10 |
|
Join Date: Sep 2014
Location: Arvada, CO
Posts: 1,004
|
Loosen the inside 13mm locknut on both swingarms with an open ended wrench. Do this on both left and right swingarms to prevent the axle from binding during the next step.
Tighten the outside locknut with a socket wrench. As you tighten the nut, watch the chain get tighter and tighter. Test the chain slack by pushing the chain up in the middle of the chain. The distance between the top of the chain and the bottom of the swingarm should be between 10mm and 25mm. The chain should not touch the swingarm. Continue adjusting the outside locknut (in or out) until your chain is within spec. If it gets too tight, you may have to back out the outer locknut and then use the inner locknut to loosen the chain.
__________________
Red 5 standing by! 2015 CSC red RX3 with 19" front wheel, Shinko 804/805, skid plate, tall seat, 13T/45T sprockets, progressive shock, Winyoochanok windshield, GENSSI LED headlight, SW-Motech tankbag, Shorai Lithium battery 2014 Ural Patrol Last edited by detours; 08-17-2015 at 02:59 AM. |
|
|
|
08-17-2015, 02:08 AM
|
#11 |
|
Join Date: Sep 2014
Location: Arvada, CO
Posts: 1,004
|
With the chain tension adjusted, you now have to align the axle. CSC recommends measuring the distance from the swingarm bolt to each side of the axle bolt (http://www.cscmotorcycles.com/Articles.asp?ID=257).
If you don't have a metric ruler in millimeters or a yardstick to 1/16 inch, you can also use the axle alignment marks on the swingarm as described below. This is less exact but close enough. The axle goes through a small bar on the left and right swingarm. On the swingarm below it, you can see a set of alignment marks. By comparing the position on the left and the right side, you can make sure the axle is straight across.
__________________
Red 5 standing by! 2015 CSC red RX3 with 19" front wheel, Shinko 804/805, skid plate, tall seat, 13T/45T sprockets, progressive shock, Winyoochanok windshield, GENSSI LED headlight, SW-Motech tankbag, Shorai Lithium battery 2014 Ural Patrol Last edited by detours; 08-17-2015 at 03:00 AM. |
|
|
|
08-17-2015, 02:42 AM
|
#12 |

Join Date: Jul 2008
Location: Idaho
Posts: 25,054
|
Thanks for posting the nice tutorial and excellent photos.
 It is safe to bend each tab of the safety washer twice. However, if you bend either tab a third time, you risk losing the 30mm nut which holds the sprocket to the counter shaft (C/S).  Therefore, I don't recommend using the same safety washer more than 4 times. Therefore, I don't recommend using the same safety washer more than 4 times. 
__________________
Spud "Never argue with an idiot. He will drag you down to his level, and beat you with experience." Mark Twain2015 Zongshen ZS250GY-3 (RX3) 2006 Zongshen ZS200GY-2 (Sierra 200) 2005 Honda XR650L 2004 Honda CRF250X 1998 Kawasaki KDX220 Mods made to my Zongshen ZS200GY-2: http://www.chinariders.net/showthread.php?t=6894 |
|
|
|
08-17-2015, 02:55 AM
|
#13 |
|
Join Date: Sep 2014
Location: Arvada, CO
Posts: 1,004
|
Thanks! Let me know if you have any corrections or recommendations and I'll gladly update the instructions.
This might be a good page to link from the Maintenance sticky.
__________________
Red 5 standing by! 2015 CSC red RX3 with 19" front wheel, Shinko 804/805, skid plate, tall seat, 13T/45T sprockets, progressive shock, Winyoochanok windshield, GENSSI LED headlight, SW-Motech tankbag, Shorai Lithium battery 2014 Ural Patrol |
|
|
|
08-17-2015, 02:59 AM
|
#14 |
|
Join Date: Jul 2008
Location: Idaho
Posts: 25,054
|
Indeed, it is important to verify the rear axle is the same distance from the swingarm bolt on each side of the motorcycle. Otherwise, the rear wheel will be canted. The canted wheel will accelerate wear of both sprockets, the drive chain, and the rear tire. In addition, the canted wheel will rob power from the engine.
After removing the plastic cap covering the swingarm bolt, I use a tape measure to determine the distance from the center of the swingarm bolt to the center of the axle on each side of the motorcycle. If the two distances are not the same, I tighten/loosen the axle adjusting nuts until the two measurements match. The rear axle is now parallel to the swingarm bolt, and the rear wheel is not canted. After aligning the rear axle with the swingarm bolt, I once again check the slack in the drive chain. If the slack needs to be adjusted, I tighten/loosen each axle adjusting nut the same amount on both sides of the wheel. Since the nuts are hexagons, I measure the adjustments in 1/6 turns of the nut. For example, I might tighten each nut 2/6 turns, then check the drive train slack. I continue this process until I achieve the proper drive chain slack.If you turn each axle adjusting nut the same amount every time you adjust the slack in the drive chain, you will maintain the proper, parallel orientation of the rear axle and the swingarm bolt.
__________________
Spud "Never argue with an idiot. He will drag you down to his level, and beat you with experience." Mark Twain2015 Zongshen ZS250GY-3 (RX3) 2006 Zongshen ZS200GY-2 (Sierra 200) 2005 Honda XR650L 2004 Honda CRF250X 1998 Kawasaki KDX220 Mods made to my Zongshen ZS200GY-2: http://www.chinariders.net/showthread.php?t=6894 |
|
|
|
08-17-2015, 03:37 AM
|
#15 |
|
Join Date: Jul 2008
Location: Idaho
Posts: 25,054
|
Since you should only use the safety washer four times before replacement, it is wise to keep a small supply of spare safety washers. These washers only cost $0.88 apiece. I need to remember to order some of these safety washers the next time I get parts from CSC.
The CSC part number for these safety washers is Z20-113.The Suzuki DRZ400S/DRZ400E motorcycles also use a counter shaft with very similar, or identical dimensions. These bikes also use a 30mm nut to secure the C/S sprocket to the counter shaft. Therefore, if you are in a pinch, you can also use the Suzuki safety washer designed for these motorcycles. The safety washer has Suzuki part #09167-22012.The Suzuki safety washer is held in place by the splines of the counter shaft. 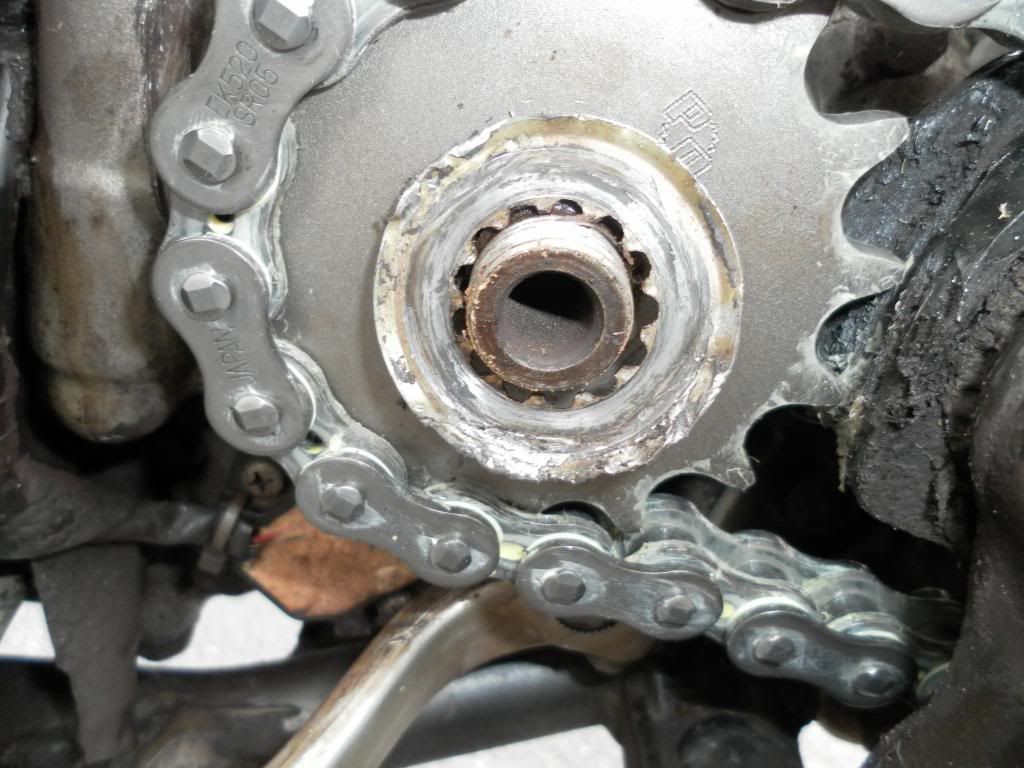 After placing the 30mm nut over the washer, bend part of the washer over one side of the nut with a pair of pliers. 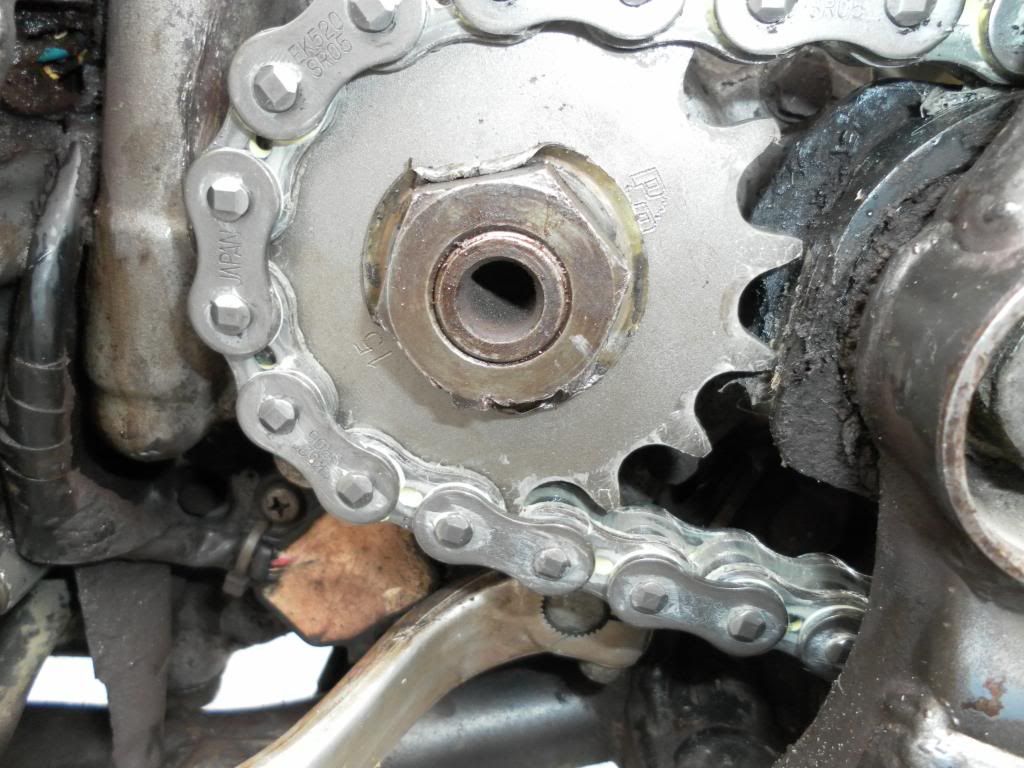
__________________
Spud "Never argue with an idiot. He will drag you down to his level, and beat you with experience." Mark Twain2015 Zongshen ZS250GY-3 (RX3) 2006 Zongshen ZS200GY-2 (Sierra 200) 2005 Honda XR650L 2004 Honda CRF250X 1998 Kawasaki KDX220 Mods made to my Zongshen ZS200GY-2: http://www.chinariders.net/showthread.php?t=6894 |
|
|
|
|

|
 |
|
|


 Linear Mode

