 02-23-2016, 04:45 PM
|
#1 |
|
Join Date: Feb 2016
Location: Kingston, NY
Posts: 66
|
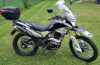
Hawk 250 technical info thread
If anyone has information or finds the info incorrect, please comment and I will be happy to update it. I think it would be helpful to have a goto spot for all things Hawk related. I'm new to the site and just purchased a Hawk 250, but I've tried to compile all the info from every thread I could find on this site about the bikes.
My brother and I also ordered from APCUSA.COM and very fast shipping from RPS, I just received them (the colors came as ordered green and black two pack) and are awaiting the MCO's. I highly doubt we will be able to register them here in NY as someone who just purchased three of them recently (not sure from what site) tried to register them and was only approved as ATB, so we may have to try the Vermont route, but I will update everyone once we know otherwise. __________________________________________________ ________________________________________ Haosen Hawk 250 Hawk 250 model # HS250Y-A: Manufacturer is officially Chongqing Haosen Motorcycle Co.,Ltd. Registering the Bike: INSURANCE - Inform them that it's a Chinese bike and give them the VIN. Also, here's a direct link to the manufacturer/model if you need to provide any specifics: http://www.haosenmotor.com/Products/.../HS250Y-A.aspx SPROCKETS/GEARING - stock bike with 15T/50T gearing 17 tooth countershaft sprocket (what make and model - xl185?) 45 tooth rear - JT rear sprocket, model JTR269 - Rear sprocket order for XL185 (will have to remove 4 links if only changing rear sprocket) 17 tooth info -As well as ordering the JTF259.17 for the front. Note that the front sprocket that came off the Hawk has a 17.5 mm diameter to the keys and a 20 mm diameter for the shaft. The JTF259.17 has a 18 mm diameter to the keys and a 20 mm diameter for the shaft. Both seem to work fine. The shifter shaft spline is 11mm. CARB REPLACEMENT AND SETTINGS Mikuni 30mm carb. (VM30 / VM28?) Jets - order for VM28/486 Jets 115 main jet 30 slow SETTINGS Rejet (I used a 125/30 at 3000 feet) and then set up the idle mixture (the screw that points straight up next to the float bowl) at 2.0 turns out. Adjust from there if your "barely off-idle" pops or lean-farts a little. I started at 1.5 turns out and had to open it a little. Need to learn more about carburetor tuning? - http://www.chinariders.net/showthread.php?t=15539 Initial Maintenence: See post below in thread for Assembly of the bike out the crate. · Rear disk brake - make sure there's plenty of movement freeplay in the linkage at the master cylinder to pedal otherwise it may not work properly once the fluid heats up. · Tighten every nut and bolt as most seem to be delivered only finger tight, including tightening the steering stem nut and wheel spokes · Replace spark plug - NGK Spark Plug, Wire and Boot replacement · Check the Valves clearance · I'd also ensure that the stator harness is properly routed around the countershaft sprocket before ever riding the bike. · Change out the factory oil immediately · the original Honda CG125 engine that these are copied from have a screen there, not a paper filter. There is a centrifugal filter under the clutch cover that should be cleaned eventually. CG125, but also the XR/XL 185/200 uses the same mesh centrifugal filter Valves Adjustments - so far I've found between .02 to .08 as recommendations Rotate the crankshaft another 360 degrees, and check again. You want the camshaft positioned at TDC on the compression stroke. You might have the camshaft positioned at TDC on the exhaust stroke. es, that's correct. After you determine the exhaust stroke, the compression stroke will be the next full revolution of the crankshaft. When you reach the compression stroke, loosen both tappets, and set the correct valve lash. Next, rotate the crankshaft one revolution, to the exhaust stroke. Only the exhaust valves should be tight. Then rotate the crankshaft one more revolution, to the compression stroke. Both valves should be loose. Check the valve lash once again, and adjust if necessary. If the valve lash is correct, you are finished. Hawk stator output possibly found - 160 watts Brakes: Rear disk brake - make sure there's plenty of movement freeplay in the linkage at the master cylinder to pedal otherwise it may not work properly once the fluid heats up. Quirks about the bike: The speedo cable seems to go in and out often so check that it's tight and it's speed may not be accurate ever The bike needs to have the tank completely filled with gas before it sometimes starts to register the fuel levels. The air filter seems to get covered in oil frequently, starving the bike for air - remedy = use a cone air filter or separate catch fort the oil. The transmission is a little touchy in 1st/N/2nd, hard to find N at times and seems to drop into gear when I shut the engine off. Carb works OK, but got to fart around with the choke and idle screw correctly to start/idle - settles down after warming up a bit. Listed torque values are: Front axle is 63 Nm Top bolt of of front shock clamp 22 Nm (NXR 150 has side-bolt clamp, Hawk has front-bolt clamp) Bottom two bolts of front shock clamp 32 Nm Swing arm is 88 Nm Mono shock is 44 Nm top and bottom Rear axle is 93 Nm Handlebar Clamps 26 Nm (dot on clamps pointing at front wheel) Front disk brake caliper 30 Nm Valve adjustment jam nut 14 Nm Front and top engine mount bolts 35 Nm Bottom and rear (larger) engine mount bolts 60 Nm Multi-bolt engine mount plates 35 Nm FAQ: Hawk stator output possibly found - 160 watts Questions??? What motor is this specifically? Possibly the XR150? The engine is basically the same frame of architecture as the XR200 engine, and they only use a cleanable screen. The secret is to attach a filter to the vent hose, so as to not draw dirt into the engine. Honda NX 150 (Engine [maybe] and Some electrical layout - Battery on right side) Honda NXR 150 ESD (2009) (Frame, Plastics, Attachments, Front Disk, Rear Drum, non-applicable ECM controlled engine - Battery on left side as on Hawk) SPEC’S Manual transmission, front wheel size 80/100-21", rear wheel size 110/100-18", 250cc air cooled single cylinder four stroke engine, electric and kick start, seat height of 35.4”, front and rear hydraulic disc brakes. The RPS Hawk Dirt Bike features an air cooled, four stroke single cylinder 250cc engine and a top speed of 59 MPH. Last edited by Fame28; 03-01-2016 at 12:16 PM. |

|
|
02-23-2016, 04:46 PM
|
#2 |
|
Join Date: Feb 2016
Location: Kingston, NY
Posts: 66
|
Reserved for state registered as on road
ALABAMA - will not register the Hawk for street legal use CALIFORNIA - will not register the Hawk for street legal use NORTH CAROLINA - will not register the Hawk for street legal use PENNSYLVANIA - will not register the Hawk for street legal use Last edited by Fame28; 04-22-2016 at 08:35 AM. |
|
|
|
02-28-2016, 02:47 AM
|
#3 |

Join Date: Oct 2015
Location: Houston Tx
Posts: 157
|
http://www.amazon.com/Coleman-Comfor...atv+seat+cover
I like it. It's very comfortable for the price. I like your idea of putting it under the vynil I think I'm going to do that.
__________________
Brandon 2014 Hawk 250 Firehawk minibike Previous bikes~ 1995 Yamaha YZ125 1998 Yamaha YZ250 1981 Yamaha YZ465 1987 Honda TRX 250R X2 one stock one modified 2002 Buell Blast 2001 Buell X1 Lightning 2000 Kawasaki ZR7 |
|
|
|
03-01-2016, 12:00 PM
|
#4 |
|
Join Date: Feb 2016
Location: Kingston, NY
Posts: 66
|
Assembly Instructions
Hawk 250 Assembly Steps Write up by Torgo Link to pdf file http://www.chinariders.net/showpost....6&postcount=12 1) Uncrate / Front Wheel:
- Uncrate. Remove plastic wrap, plastic shipping straps, and cardboard. - Disassemble steel shipping case by unscrewing and removing nuts. - Open the parts box, identify the panels, sort and organize. Read Owner’s Manual. - Install the cable retention brackets to both front forks before installing the front tire. - Remove front axle from shipping case by loosening the axle nut and then tap out the axle bolt from the retention bracket on the steel shipping case. - Jack up the front and install the front tire. Remove the shunt from between the front brake pads. Add the speedometer connection to the right hub. There is an arrow for proper orientation that points up. There is a point on the right fork – the cable should be routed below this. On the left side, install the additional bearing that is included with the speedometer connection. The front rotor should line up with the front break pads. - Lightly grease the front axle bolt and then install through the fork, speedometer, tire, bearing, fork. You may have to adjust the pinch bolts for one or both forks to get things to line up correct or to make installation easier. - Loctite to the thread of the bolt, tighten front axle nut to torque as specified in owner’s manual (45ft/lbs). - The front forks should be adjusted to an introductory level, an inch or two at the top; final adjustment and setting the pinch bolts will be done later. 2) Controls: - Now that it’s up on two wheels, jack it up and install the rear shock bolt. I lightly greased this bolt as well, then loctite and torqued the nut to 33ft/lbs. That wasn’t specified in the owner’s manual, but seemed to be a pretty common value for other similar bikes. - At this point, I inflated the tires to the pressures in the owner’s manual, 40lbs front, 32lbs rear. - Installed the kick stand spring. (PITA – needed vice grips and someone else to hold the motorcycle why I pulled it into place.) - The handle bar went on next. I centered it, aligned it vertically and set the caps and the 4 bolts that go with them. Just hand tightened at this point – strong enough to push it around, but not set in case they need to be adjusted. - Installed the clutch control. Again, just hand tightened, final adjustment later. - Installed rear brake pedal. Lighty greased and installed, capped with washer and cotter pin. Pulled the pin from the hydraulic connection, then reinstalled through the hole at the end of the pedal bracket. Added brake spring, and spring for the brake light switch. Trimmed the cotter pins. - Install and loctite the rear turn signals. - At this point, I made sure it was in neutral and gave the brakes a quick test. First stationary, then on my driveway which provided a slight slope. All good. 3) Panels/Battery: - Now on to the panels, but before that, it’s a good time to remove and charge the battery from under the left body panel. The left side panel was the only one installed when shipped. The battery is “some assembly required” as in the acid is in a separate container. You should look up how to do this as the initial charge of a lead-acid battery is a special case, and it will determine its long term behavior. Reinstall when correctly charged. - The screws should have a metal washer on the head of the screw and a rubber washer on the panel side. Loctite all of them: - I used 3 mid-length screws for the plastic assembly over the muffler. This was a weird fit, and I had to twist the plastic a bit, but it worked. Don’t tighten the screws down all the way until all three are installed, it’ll allow for some twisting. - The front tank panels used 2 short-length screws. There is also a bracket that ties them together, this also took 2 short-length screws where the bracket connects to the two panels, and a longer screw where it connects to the frame at a rubber mount point to hold it all together. - The two body panels both used longer-length screws, and I did have to bend the right side bracket where it mounted to get it aligned. The right side bracket has a tight fit under the back part of the seat, a large flat head screw driver works well to press the rear tab into place under the muffler panel. - There were 4 rubber grommets included that go with the front fender. Install them first into the holes in the fender then use the 8mm bolts and washers to mount above the front wheel. 4) Electrical / Cabling: - At this point, I jacked up the bike and set the front forks. There are 6 pinch bolts, set them to 16ft/lbs per the owner’s manual. - The front break cable had a rubber grommet and a plastic ring to help guide. The rubber grommet fit into the left cable retention bracket. The plastic ring needed some help, but I was able to squeeze it into the other loop retention bracket farther up on the fork. I did have to remove the retention bracket and shape it a bit to snap the ring into it. - Install the speedometer. This has three bolts that fit through pre-installed rubber mounts. Use the nuts provided (and loctite) to bolt down. - The speedometer cable is pretty stiff, and now is the right time to start looking at how the cables and wiring should optimized. There are several cables: clutch, throttle, front brake, speedometer, and various wiring connections that all have to be made immediately behind the headlight. The headlight itself needs room to fit above the wiring harness. With a little adjustment most of the cabling falls into place, and the speedometer cable sits to the outside and somewhat retains the others. Loctite it to the speedometer. - The various electrical connections can now be made from the handle bars and speedometer. These are pretty much just matching up colors and shapes. - Install/loctite the front turn signals and connect the wires. - Final electrical and body connection is the headlight. Connect the electrical connector and the two additional wires. There are two small rubber mount points that accept plastic pins on the bottom of the headlight assembly, line these up and rotate the headlight into place. If the cabling and electrical connections were done correctly, there should be a space to accept it, then line up the screw positions – I used the remain two small screws with loctite. - Last thing I did was realign and secure the handlebars, loctite and torque to 16ft/lbs, same as pinch bolt specification and similar to what I saw for other bikes. Added the stylish “Hawk” bar protector, and it was done! At this point, I went over everything I did, and double checked all the connections, screws, bolts, nuts, electrical, etc. Made sure I had added loctite, double checked that I had torqued things correctly, especially the values that were listed in the owner’s manual, and just gave it an all around inspection. 5) Starting for the 1st time: - Change the oil before starting it up. I expected this to be some type of cheap mineral oil from some of the comments, but what they had in there looked to be a decent viscosity. However, the real problem that made me glad I did this was that there was only half the recommended amount. I put in 1.6qt of 15W-40 per the owner’s manual. - Put gas in the fuel tank (duh) and set the fuel valve. - Find the choke on the carburetor. There are three settings on the stock Sheng Wey PW30 (open, half, closed). For me, I had to set the choke to half to get it firing. MAKE SURE TO START OUTSIDE. An open garage door will not suffice. Hopefully there’s a light breeze. - Set the choke as needed, turn on, confirm neutral, set kill switch, and start it up. After it warms up a bit, make sure to open the choke. It should idle, but adjust with the idle adjustment on the carb if needed. - However, before you calmly adjust the idle setting, if your bike is like mine, you will briefly think it’s on fire or you have a serious oil leak. This is probably the paint, or more likely a light coat of oil that they sprayed things with to prevent corrosion during shipping, but it will burn off when it first gets up to temperature. Try not to be alarmed. - Once your bike stops sending out smoke signals, put it in gear and away you go. |
|
|
|
03-01-2016, 06:13 PM
|
#5 | |
Join Date: Oct 2015
Location: Post-industrial wastelands near Albany NY.
Posts: 45
|
Quote:
The Hawk is a 229 cc version of the Honda CG engine which is the same type of engine that is used on the Honda NX 150. The camshaft on CGs sits inside the engine case and is connected to the valve lifters via pushrods. WeldanGrind provides a brief history here: http://chinariders.net/showthread.ph...X-3#post196393
__________________
The short list: 2011 Suzuki Boulevard C50T 2021 Chongqing Liyang Jiayu Hawk 250 DLX EFI 2017 TaoTao CY50-B scooter 79cc big bore kit - 45 MPH! (sold) 2015 Haosen Hawk (sold) 2002 Honda XR100R - project bike almost done. 2013 V-Strom 650 Adventure (sold )-: If I listed every bike that I've ever owned you'd either 1) Get bored 2) Be somewhat envious, or 3) Wonder: "What's wrong with that guy?" 
|
|
|
|
|
03-01-2016, 09:18 PM
|
#6 | |

Join Date: Mar 2008
Posts: 2,436
|
Quote:
NX150 (KW1 | 62.5*49.5) http://www.motorspeed.com.br/wp-cont...09/NX89a92.pdf NXR150 Bros (Similar to CRF150F | early 63.5*49.5 / recent 57.3*57.8) http://cassiomecanico.blogspot.com/p...co-xl-250.html
__________________
Last edited by humanbeing; 03-02-2017 at 07:44 PM. |
|
|
|
|
03-08-2016, 06:17 AM
|
#7 |
|
Join Date: Oct 2015
Location: Post-industrial wastelands near Albany NY.
Posts: 45
|
Does anyone know which Honda OEM clutch cable(s) fit the Hawk? I had my clutch cable routed too close to the exhaust pipe. The heat melted both the vinyl housing and liner )-;
__________________
The short list: 2011 Suzuki Boulevard C50T 2021 Chongqing Liyang Jiayu Hawk 250 DLX EFI 2017 TaoTao CY50-B scooter 79cc big bore kit - 45 MPH! (sold) 2015 Haosen Hawk (sold) 2002 Honda XR100R - project bike almost done. 2013 V-Strom 650 Adventure (sold )-: If I listed every bike that I've ever owned you'd either 1) Get bored 2) Be somewhat envious, or 3) Wonder: "What's wrong with that guy?"
|
|
|
|
03-08-2016, 08:51 AM
|
#8 | |
|
Join Date: Mar 2008
Posts: 2,436
|
Quote:
__________________
|
|
|
|
|
03-08-2016, 09:50 AM
|
#9 | |
|
Join Date: Sep 2015
Posts: 108
|
Quote:
This isn't the Honda OEM cable, but I got a new cable for mine here: http://www.vmcchineseparts.com/colle...bike-version-7 It is 1" longer than the original cable, made it a little easier to route, and functions well after I got everything adjusted. I ordered some other stuff like levers from there, and they all work, but are a little smaller than what the Hawk comes with. |
|
|
|
|
03-08-2016, 06:48 PM
|
#10 | |
|
Join Date: Oct 2015
Location: Post-industrial wastelands near Albany NY.
Posts: 45
|
Quote:
This is exactly what I need. As you know, the stock cable is a tad short making it difficult to route. Especially when the rubber clamp falls off. I didn't make sure there was a washer on both sides of the bolt that held that clamp in place. It's probably somewhere on the trail, buried in mud. Zip ties are more reliable and easier to replace (-: Thanks a million! Thanks a million!
__________________
The short list: 2011 Suzuki Boulevard C50T 2021 Chongqing Liyang Jiayu Hawk 250 DLX EFI 2017 TaoTao CY50-B scooter 79cc big bore kit - 45 MPH! (sold) 2015 Haosen Hawk (sold) 2002 Honda XR100R - project bike almost done. 2013 V-Strom 650 Adventure (sold )-: If I listed every bike that I've ever owned you'd either 1) Get bored 2) Be somewhat envious, or 3) Wonder: "What's wrong with that guy?"
|
|
|
|
|
04-05-2016, 11:58 PM
|
#12 | |

Join Date: Dec 2014
Location: Deerfield Beach FL
Posts: 1,410
|
Quote:
Take your axle with you to any hardware store. My favorite is ACE Hardware. They have a great selection of fasteners. / |
|
|
|
|
04-06-2016, 12:35 AM
|
#13 |

Join Date: Feb 2016
Location: George West, Texas
Posts: 4,097
|
Without saying, metric metric metric, just like bicycles.
Mind that bolt and add a little silicone grease for ease of install. Dont over torque the nut and Crush those bearings. Afterwards, check it, just like the drivechain. Good call adjust, Ace has everything.
__________________
***************************************** 2015 Bashan"Blaze" BS250GY-31 (DB-07K-250) GONE 2017 Suzuki V Strom 650 XT "We are all born ignorant, but one must work hard to remain stupid." ~Benjamin Franklin~
|
|
|
|
04-06-2016, 10:22 AM
|
#14 | |

Join Date: Mar 2010
Location: Volcano, Ca
Posts: 7,078
|
Quote:
__________________
"Light a fire for a man, and you heat him for a day. Light a man on fire, and you heat him for the rest of his life." 2007 Suzuki DRZ400S (SM convert) 2009 Q Link XP 200 1967 BSA B25 250cc Starfire 2022 Royal Enfield Interceptor 650 2023 Royal Enfield Scram 411 1948 Royal Enfield Model G 350 |
|
|
|
|
|

|
 |
| Tags |
| haosen, hawk, hawk 250, hs250y-a |
|
|


 Linear Mode

