 01-07-2007, 04:18 AM
|
#1 |
|
Join Date: Jan 2007
Posts: 47
|
200GY-5 arrived!!!
Friday January 05 - Well boys she finally arrived this morning. I dont think I was this excited when I was a kid. The ole lady just looked at me with this smug expression and said, "Well, see you in....oh whatever". The truck pulled in @ 9am we unloaded the crate and to my suprise the trucker stayed to help me unpack it. I asked him if this was part of the deal? He laughed and replied " Oh heck no, I just want to see if this was one of those toy bikes". After a few minutes when all the metal frame and plastic was removed...he ate those words. I can tell it wasnt what he expected cause I know it wasnt what i was expecting. Quality wise I would have to give it an 8. We noticed that there were things that were loose and some that came unattached, like a foot peg, the brake handle, you know the usual things you guys posted. After he left I put the frame assembly on the bike stand and removed all the plastic, seat, the and majority of the electrical wiring that was wrapped around the frame. Now that the frame was partially naked the reassembly begun, the nuts and bolts have been replaced to the exact with Grade 8 (my fastenal vendor is going to love me on monday having to restock my bolt bins) each and every nut and bolt received a dash of Loctite and all threaded holes chased before installation. Now I know you guys might think that this is a tad overkill, but what I discovered is that 65% of all the holes had partial or no threads. It looks at though the fasteners were driven in a blind hole creating there own threads. But 2 hours with a few metric taps and a thread pitch gauge solved the problem. While removing the wiring harness I did noticed the connectors used were poorly assembled, with closer inspection there were 2 broken wires, which were pinched between a clamp and frame, my Fluke confirmed that. With that in mind I took a detailed picture of the complete wire harness from front of the frame to the rear and removed it. 8 hours later and a few hundred feet of silicone wiring and shrink tubing (well it seemed like it) I managed to duplicate the harness using the same connector ends with better pins. So far I been at it for 12 hours and the bike looks like it did when I removed it from the crate minus the plastic. SaturdayJanuary 06, I went to my local bike shop and bought an x ring chain and 2 new tubes to replace the factory tubes and while I was there I had them true the rims and double check everything, they replaced the cheap inner rim band and matched the bearings for future reference. The bearings are actually quality bearings and replacement are available from Timken or Boca which ever you prefer. With that in mind its back to the shop. After spending a couple of hours with the wife she and I mounted the wheels, changed the oil, greased the swing arm and double checked everything. We both looked at the plastic and came to the same conclusion... Those stickers have to go. As she stripped the decals I prepped the underside of each piece and masked them for a coat of Rhino lining. 3pm The spray lining is dry and the white fairings are now a nice matte black. I found some low profile 4mm isolation dampners that I use here at my shop on electric fan motors for shock and thought....Hmmm.. after an hour they looked right at home under the engine. 8pm We filled the tank and crossed our finger, turned the key and after a few cranks to our suprise she started. It idled a little rough but after a few minutes of tweeking and a dwell tach she was purring in no time. I kissed the wife put on my helmet and rode to the 60 acre field behind the house for a break in ride. Those dampners did the trick there was hardly and vibration at all but than again it was an easy break in ride. I'll let you know after its broke in and I can get her past 6k rpms. This bike is incredible for the price I paid for it. It took a little bit of work to correct things but well worth the wait. I fought the urge to just slap the wheels on and go for a ride and Im glad I didnt. The only thing I have to face now is taking the wife out for a night on the town to make up for the time spent on the bike and telling my truck that I wont be seeing much of her any more.
|

|
|
01-07-2007, 07:24 AM
|
#3 |
|
Join Date: Aug 2006
Location: Sweden, Europe
Posts: 304
|
Serious assembly!, making a new electrical harness and going over all threads, you must the ideal seller to buy used stuff from!

__________________
"Failure is always an option!" Qingqi QM200GY -06 |
|
|
|
01-07-2007, 09:26 AM
|
#4 |
|
Join Date: Jan 2007
Posts: 47
|
Lifan engine build
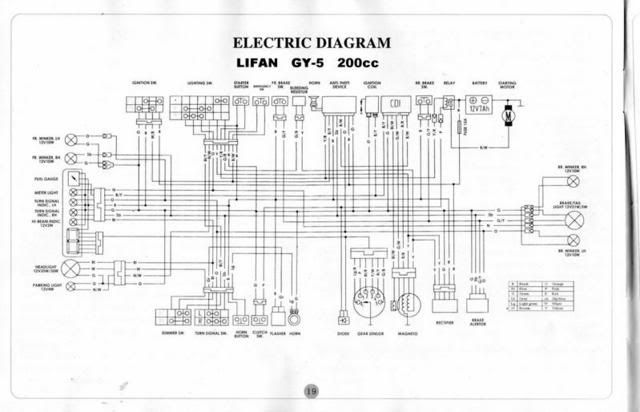
The factory bolts were so cheap you can actually snap them with 2 wrenches so those went in the trash, the old wiring harness is just wires now, so soon that will be in the trash also. But you guys keep in touch Im going to start producing parts like the wire harness and such, whatever I can produce here in my shop. I guess the only way I could figure the price is material + labor. It took 8 hours for a complete wire harness so you can see that its real labor intensive, the silicone wire I use is designed for high temp (up to 1000 degrees) turbine engines use so I figure if its good enough for a turbine engine its good enough for motorcycle use. Im also going to buy some spare Lifan 200cc OHV and OHC engines and break them down to see what kind of performance I can get out of them. My brother owns a maching shop so Im sure we can fabricate parts using better material. I read that someone was looking for an adapter plate to swap out the factory carb for a 30mm as soon as I can get a 30mm carb thats going to be in the works to. Also what do you guys think about a bolt kit to replace the factory bolts, all the bolts I used are Grade 8 steel and are identical to the factory bolts including the allen head cap bolts and all of the hex heads. Packaging will be a hassle being I would have to lable each set of bolts to let you know where they go. I didnt receive a wiring schematic with my bike though I know they are out there but Im thinking about making a decal of the schematic that is small enough to apply below the back side of the seat or where ever you can find a clean dry place to put it. Decals will include the light bulb part numbers or after market bulb type. Things that should have been thought out by the company. In my profession I do alot of field work in alot of different enviroments some harsh and extreme to very friendly and comfortable I know that if I have to work on a particular machine I would like to have some technicals there to assist me, well its the same with these bikes...theres no telling where you might break down, like on a trail, in the woods or mountains or even on the road( depending on your geographical location) so imagine having your technicals with you. Electrical problems? pop off the seat and look at your schematics, bulbs burnt out, time for an oil change, chain stretched, have the numbers with you as you walk into the store. It would almost be like a miniture manual for your bike. My brother has been making turbine parts for over 12 years I called him this morning and asked what he thought about making some performance mods for these Lifan engines he said If I could get ahold of some he could break them down and see what he can do to tweek out a few more HP and torque. I also have a gasket machine here so I will be able to produce the gakets for these engines, it looks like a large computer scanner with an automated cutting and punch arm, same thing that manufacturers use to mass produce gaskets just smaller. You put the surface to be sealed face down, the computer scans it and cuts it out. Ive used it to make gaskets for equipment that was 80 years old and it works flawlessly. So if you guys can think of anything else let me know.
|
|
|
|
01-07-2007, 04:47 PM
|
#6 |
|
Join Date: Sep 2006
Location: COLUMBIA, SC
Posts: 973
|
I thought Dad and I had the prep thing covered, but you definitely are one step ahead! Put some contact info in this thread with parts and pricing that you will be offering.
Dad made some "Throttlemeister" style bar ends out of stainless for ours. We estimated costs for engineering, tooling, and fabrication to be well beyond what they could be sold for. He needed to do something, because he was getting numbness in his hands when we would go out for rides. BTW, the vibration to the bars is almost non-existant with these now.
__________________
2008 Jonway MC-70-150 2007 Roketa DB-07B (RSM-200E) 2006 Roketa DB-07A (RSX-200E) 1995 Kawasaki Concours (ZG1000) |
|
|
|
01-07-2007, 08:03 PM
|
#7 |
|
Join Date: Jan 2007
Posts: 124
|
Wow, great information. I need to get started, haha.
|
|
|
|
01-07-2007, 09:18 PM
|
#8 |
|
Join Date: Jan 2007
Posts: 47
|
I ordered a complete Lifan wiring harness as a template, so as soon as it gets here I'll be able to start producing the harnesses. I spent all day riding around and went to my brothers for a few hours crunching massive amounts of numbers figuring out engine performance and we came up with figures that were depressing. A stock engine running a stock carb with stock exhaust produces 16HP, we all know this from stats on the web sites well thats confirmed. Now here is the kicker replacing the stock carb with a 30mm will not increase HP at all, in fact it would be just like your running rich on the mixture and risk detonation. Air/fuel volume versus actual engine combustion chamber cc doesnt add up one bit. Stock engine displacement isnt capable of burning the extra amout of fuel without problems, in other words theres not enough room in the chamber and the compression is to low. But hey, what do a couple of jet engine mechanics know....lol. In order to to use a 30mm carb the modifications will be as such: First you would have to increase engine cc to 238cc or better, up the compression by 9:5.0 ration, tune the cam for a smoother exhaust ramp profile and intake open duration, (takes a deep breath) port the intak for an increase air volume passage, and design a pipe which will provide enough back pressure. With these mods your going to have a 250cc engine producing roughly 28HP, for quick math. 200cc = 16BHP, adding 50cc will be adding 4 more BHP for a total of 20BHP for a stock 250cc engine. If all the mods were done you will have a total gain of 12BHP. Now those numbers above arent actual just a reference if you want to really do a conversion you would have to do this. Divide cc by 16.4 to get cubic inches the final figures arent exact because you have to factor in mass volume and compression and that a totally different animal so you see, this isnt an exact science due to alot of factors you have to account for and geography is one of those factors being most engine manufacturers base figures on absolute ambient temperture at sea level. We used the same formulas used for turbine engines and automotive engines and came up with the same results. So if your thinking about adding a 30mm carb to a stock engine, Id say sleep on it.
i |
|
|
|
01-07-2007, 09:28 PM
|
#9 |
|
Join Date: Jan 2007
Posts: 124
|
Wow, great reading and I am learning from your posts!
If you do start doing kits, I would like to purchase your first wiring harness and a bolt kit, when you figure out the costs, please let me know. A sprocket change is my first change. |
|
|
|
01-07-2007, 10:29 PM
|
#10 |
|
Join Date: Jan 2007
Posts: 47
|
Well good Im glad your getting something from my rants and raves. I will surely let you know when the first harness is complete. The silicone wire I use is probably over kill and quiet expensive, its around $2.98 a foot and I think I used almost 83 feet but it was all I had on hand, to make it more marketable Im going to downgrade to quality U.S. made wire the only problem is, it is prone to corrosion mainly at splices and connection where as the silicone wiring is designed for use in high temp and high corrosion enviroments. Now lets get back to cost, the silicone wiring harness alone is $247.34 not including labor, not cool being thats 1/5th the price of the whole bike. I couldnt imagine the cost if you didnt buy the same wire in bulk. Im not sure but I think that same wire comes in 100ft rolls @ $4.90 a ft. I buy it in 1000 ft rolls @ $2.98. To match the same color code as the original you can imagine how many 100 ft spools you would need. Hence the downgrade to quality U.S. made wire. The Lifan harness I ordered is the complete harness including engine and it cost me $55 plus shipping. I calculate that my harness would sell for double that but your getting a much better made harness. Now I dont think that alot of riders will be buying due to cost, if you think about $55 compared to $110, but how many harness will they buy during the life time of the bike. I mean dirt riders are faced with corrosion due to wet conditions plus vibration where as street rider will only have to deal with vibration unless they like riding in the rain. What about maintenance how many riders will condition and service their harness after each ride? I mean these bikes are pretty much the Bic lighters of motorsports. They are cheap so if you blow it up, throw it away and buy another one. Personally $1240 is alot of money..Period...If I had the same mentality as some consumers I would be broke cause I dont have a money tree growing in my yard...Do you?...lol. Every picture I seen of every bike on this forum and others, you can see that maintenance isnt a priority, mud caked up everywhere bike looks like hell. They need to realize that mud caked up around nuts, bolts, chains, wiring, ect...harbors moisture. think about it...go out in your yard in the middle of summer and dig a hole in the ground, is the dirt moist? Im sure it is. Moisture leads to corrosion and that leads to a bike that is rusting away as you sleep. If you live up north where they salt the roads for winter the salt is remains in the ground well through summer so with that in mind conditions can get bad really quick. I have the same problem here in Louisiana with the salt in the air but after each ride I hose her down with fresh water and with a towel and some compress air I blow off it dry then continue with regreasing if it needs it, and I check all the harness connection points for moisture. You can get silicone grease @ your local automotive parts house apply this to the connectors and your problems with corrosion and moisture will go away but you will have to clean off the old grease being in time will collect dust and dirt, but a shot of brake cleaner will desolve the old stuff and clean the connector and ready it for another dab of grease. Also you can get quick dry silicone lubricant and spray all your metal parts down after you dry your bike off. This lubricant drys fast and leaves a protective film that is not greasy nor will it hold dirt. Im sure you could do the same with WD40 or other lubricants but it doesnt dry so your bike will gather dirt. With a silicone treatment mud, dirt and gunk rinses off a whole lot easier. Ok well that enough long winded maintenance blabber.
|
|
|
|
01-08-2007, 07:33 AM
|
#11 |
|
Join Date: Jan 2007
Posts: 124
|
Maybe I am the only one eating up your words because this is my first dirtbike and cleanliness is my thing. Your preliminary cost of $110 is reasonable for a beter quality wiring harness. I haven't even disected the bike yet to look at mine, but after your posts, this coming weekend I will be tearing the bike down and looking at the harness and using electrical tape to cover the connections and maybe even some looming to clean it so it looks good to me.
|
|
|
|
01-08-2007, 08:18 AM
|
#12 |
|
Join Date: Aug 2006
Posts: 254
|
The quality nuts and bolts should sell well. Another thing you might consider making would be a low restriction stainless exghaust pipe with USFS approved can on the back. I bet several members would like one of those.
|
|
|
|
01-08-2007, 09:17 AM
|
#13 |
|
Join Date: Sep 2006
Location: COLUMBIA, SC
Posts: 973
|
Thanks for the info on the 30mm carb. I was considering that upgrade. Now I know that the 27mm is plenty. With the OHC engine, it runs great. I just thought there could be some room to improve, but now I know different. Thanks,
Jason
__________________
2008 Jonway MC-70-150 2007 Roketa DB-07B (RSM-200E) 2006 Roketa DB-07A (RSX-200E) 1995 Kawasaki Concours (ZG1000) |
|
|
|
01-08-2007, 10:28 AM
|
#14 | |
|
Join Date: Jan 2007
Location: Northern Vermont, USA
Posts: 1,218
|
Quote:
|
|
|
|
|
01-08-2007, 10:55 AM
|
#15 |
|
Join Date: Sep 2006
Location: COLUMBIA, SC
Posts: 973
|
The easiest way is to look at the lower left side of the engine. If you see this "bolt" then you have a push rod engine.
 See how this one's different  and you end up having the cam chain adjuster at the back of the engine right there at the starter. As in the picture above. Jason
__________________
2008 Jonway MC-70-150 2007 Roketa DB-07B (RSM-200E) 2006 Roketa DB-07A (RSX-200E) 1995 Kawasaki Concours (ZG1000) |
|
|
|
|

|
 |
|
|


 Linear Mode

