 01-22-2022, 07:06 PM
|
#61 |
|
Join Date: Dec 2018
Location: PNW
Posts: 982
|
X pect handguards Barkbusters
Handguards are required equipment on the backroad to protect against drops as much as anything and the damage it does to levers and handlebars. A good idea is to order a set when you buy your new bike and put them on before you ride it or you will see what I mean. Good time to put on some new grips too.
The X pect has really long levers that stick out on the ends making handguard installation with stock levers impossible. I bought a set of short levers including the mounting brackets and master cylinder for this bike. The team liked the way the stock levers felt and wanted to keep them and I too liked the feel so I put some thought into how it could be done. A spacer is the only way to get clearance and then the logical choice is something that will soften impact so the rubber spacer idea was born but anything could likely be used to space. What you need is a couple of 1 inch rubber spacers, two 1-inch washers, two 1 ¼ inch washers, 100 mm bolts that match the M8 bolts that come with the handguards in size but are longer to add the spacer. At first, I thought the starter control guide pin was drilled in the wrong place on the bar as you can see from the picture the throttle housing sticks out about 5/8-inch past the bar end which would require cutting it off to get the bar end flush. I still think if you do that you will shorten the throttle side like ¼ inch maybe more. I drilled another guide pin hole 5/8 inch to the left which moves it all and it comes out plus ¼ inch or so longer overall and fits nice. Just a little trimming on the end to clear the bar end. You will have to bend the handguard to get it to come around to line up and cut off the tightener where it fits on the bar end. Not a cheap mod, probably $35 total because you have to buy 4 rubber spacers and those stainless beveled bolts only come in four and are $14 but the team likes the idea of some give on the end and I have enough stock to do another bike. The rubber is akin to a rubber mallet in softness. Time will tell if it will hold up! I like that protection on that bar end! Bar end spacing work    Materials with comparison of 100 mm bolt to stock  Results  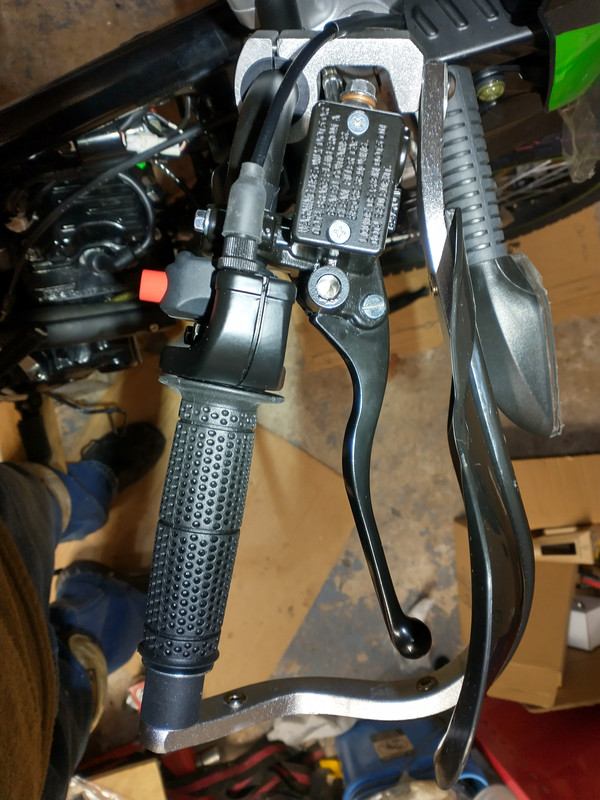 
Last edited by China Rider 27; 01-23-2022 at 10:28 AM. |

|
|
01-23-2022, 07:44 PM
|
#63 |
|
Join Date: Dec 2018
Location: PNW
Posts: 982
|
X pect tail rack
A good tail rack is mandatory and several weeks ago the team was twiddling their thumbs while waiting for parts for projects half done when the urge to make the rack for this bike came upon them. When the motivation to do a job like this comes upon you, get started before it fades away and that is what we did. Before we began, though, the other three team members wanted to get something off their chest from the get go. Apparently, they were more than a little miffed about the last time a rack was fabricated because after it was completed, I did a blog and took all the credit and they weren’t mentioned! Let me be clear, I did the design and layout and the other team members did the fabrication!
It is pretty much a copy of the rack we did for the HAWK which is inspired by the CSC rack for the TT 250. The bolt pattern is very similar to the HAWK and the difference is probably just a result of loose manufacturing tolerances. There is some slight difference between the two in the shape and curve of the seat back. When the rack gets done, visions of the backroad begin!   
Last edited by China Rider 27; 01-23-2022 at 09:53 PM. |
|
|
|
01-23-2022, 07:53 PM
|
#64 |

Join Date: Apr 2017
Location: Omaha, NE
Posts: 7,976
|
The mount holes on the TT250 rack are a hair oversized for the bolts, which I suspect was for the same reason your bolt pattern was just slightly off. The TT250 rack isn't a perfect alignment on my Hawk, but close enough that it works anyway thanks to the holes.
__________________
Hawk Information and Resource guide: http://www.chinariders.net/showthread.php?t=20331 2018 Hawk 250 - Full Mod list here. http://www.chinariders.net/showpost....62&postcount=1 2024 Royal Enfield Shotgun 650 https://chinariders.net/showthread.php?t=34124 |
|
|
|
01-23-2022, 09:26 PM
|
#65 |
|
Join Date: Dec 2018
Location: PNW
Posts: 982
|
Yaa, I think the racks for all these China Bikes that use that staggered pattern would fit but you need some play to allow for those manufacturing slight variations probably up to 1/4 inch or more really.
This rack is tight as was the Hawk because it is custom made to fit the pattern and this CR27 team is getting good at punching holes for racks. When you tighten it down it squeaks! Haha That rack on your bike was the inspiration. When I first saw it! Wow! Looks like an air spoiler! but very functional too! |
|
|
|
03-06-2022, 09:48 PM
|
#67 |
|
Join Date: Dec 2018
Location: PNW
Posts: 982
|
X-Pect break in
Comes the time to think about how to do “engine break in”. I hesitated to put this post in the thread, because the subject is similar to the topic of oil, everybody has a strong belief and many get emotional about the best way. Truth is, many don’t think about it and it gets done. This post is not meant to tell anyone the best way to break in a new engine. It is simply meant to document how this bike will be broken in and provide information for those new motorcycle owners who want to develop a strategy of their own.
Break in is defined as getting the moving parts of the engine to wear in while in the presence of good quality oil that results in the best result for performance and long life. The most important of these wear in processes being the seating of the piston rings against the engine cylinder. There are different philosophies on how to go about getting that done. The team subscribes to the moderate force approach with emphasis on the first hours of operation which includes changing the oil to remove particles and contaminants. The goal is to get good pressure on the rings with moderate throttle application with deceleration cycles over the first 4-hour period after initial startup. 1) Before start up, the oil gets changed to a known quality wet clutch rated motorcycle or equivalent oil that contains a good amount of ZDDP such as Rotella 15-40W. For this break in, a gallon of Rotella T4 15-40 was purchased. 2) Change the oil after 5 to 10 minutes. This interval is new to this break in procedure as the team had previously made the first oil change at 1 hour. The 5 minutes was suggested by a forum member “Bruces” in a thread on “how often to change oil at break in” and seemed to be better than the 1 hour we had previously used. There is a study on U tube about contaminants in new engines that is “very revealing” and led to this short interval as a means to circulate and flush the engine. 3) We plan to change the oil after 4 hours no matter the miles. I use a timer or a watch to loosely track or approximate the time. The team has broken in two other bikes with this method and after 4 hours they usually end up at around 100 miles on the odometer having been operated mostly in the 0 to 40 mph range. 4) Change the oil at 250 miles. 5) Change the oil to synthetic at 500 miles. Back story: The team developed this break in process several years ago when the HAWK was put together. By now, you know the CR27 Team is particular, and we therefore decided the best possible way to get pressure on the rings during “break in” would be to ride up hill. After some initial operation, I transported the Hawk out to a gravel logging road that began around 200 ft or so elevation climbing out about 5 miles up to about 1900 ft. The motor is pulling most all the time in this situation and up. As I made the way, I would alternately lay on the throttle in the mid-range+ and allow it to decelerate. The first time we tried this course, I got to 1900 ft to turn around and as I did, the HAWK died and would not immediately restart......... I could feel the heat rise up despite the 40-degree air temperature. She was hot after that climb. I rolled off down and bump started her, coughed and spat and off we went down through the easier air of descent. The engine a little tight, carburetor some out of tune, or too much work? Resources: http://www.dansmc.com/engine_breakin.htm Ready for break in! 
Last edited by China Rider 27; 04-16-2022 at 02:46 PM. Reason: update |
|
|
|
04-30-2022, 12:45 PM
|
#68 |
|
Join Date: Dec 2018
Location: PNW
Posts: 982
|
Oil testing at break in
The team they say, since we are doing the break in oil changes anyway, why not do some analysis for the thread to see what we can learn. The riding weather has to be bad to do this stuff right! After draining the shipping oil, we installed the Rotella T-4 with a magnetic oil drain plug to collect any ferrous metal residue that being steel or iron. At each oil change we let the oil drain overnight into a collection tub before we slowly poured off the top to evaluate the residue. Sitting overnight may allow the heavier particles to sink down through that viscosity to the bottom of the tub. Mouse click click on the pictures twice to zoom in and see detail.
Ride time 10-minutes then oil change, mileage 1 mile    Ride time 1 hour then oil change, mileage 16 miles    Ride time 3 3/4-hour then oil change, mileage 93 miles   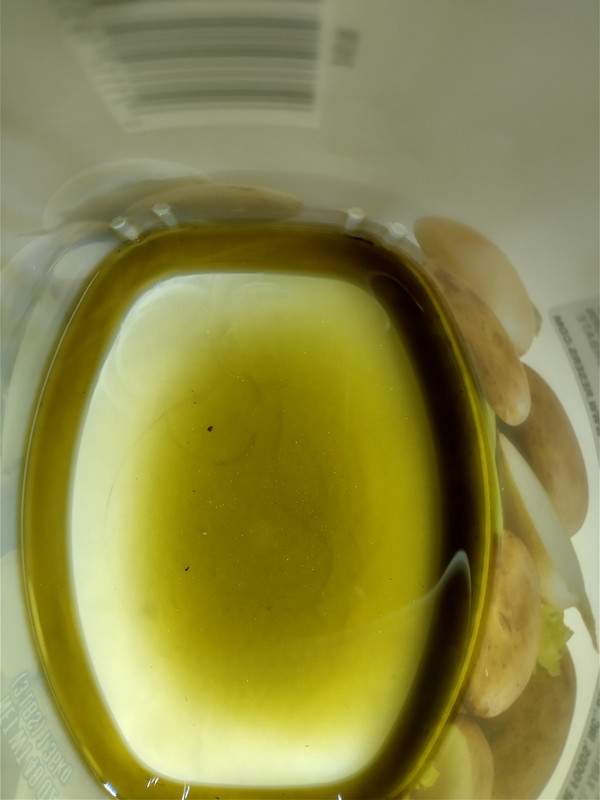 Picture of couple of nonmagnetic pieces fished out of the bottom of the oil tub and a magnet swirled through that oil with a couple of iron shards.  Picture of the oil before pour off the next day after the drain and we see particles in suspension that have a shimmering quality. This is typical of what the team has seen with all CG motors at oil change. It is not magnetic and the consensus is it be clutch friction disc material but whatever it is, it surely churns throughout the motor.  Discussion: Metal parts are wearing in creating ferrous metal residue. The small dark pieces in the oil appear to be pieces of gasket material. The small silver reflective pieces appear to be small pieces of aluminum. What we don’t know is the level of contaminants smaller than can be seen with the eye down to some microscopic level (Microns) and what may be their composition metal, fiber, etc. Interesting the make up of the iron material on the magnet is mostly big pieces, long shards, of different shapes. The team has used magnetic drain plugs before and usually you will see a good amount of smudge of metal paste of very small particles almost a liquid attached to the magnet, but this in motors that have some mileage on them and between oil changes. You do not see that here, yet, and that could be just the low mileage between oil changes. The drain plug magnet did not get all the loose ferrous metal as we found a few shards in the bottom of the drain tub but no paste. The team thought going on to a 500 mile change would be good but the curiosity is up so I think will see at 250 Last edited by China Rider 27; 04-30-2022 at 02:35 PM. |
|
|
|
04-30-2022, 05:57 PM
|
#70 |
|
Join Date: Dec 2018
Location: PNW
Posts: 982
|
This question tests the limits of the motorcycle mechanical knowledge of the team as we have never taken apart a CG motor to understand firsthand the workings so if we get this wrong anywhere you motorcycle mechanics out there can clean this up. The CG motor does not have an "oil filter" that one thinks of like a car which forces all oil through a media to trap particles.
There is a screen on the oil pump inlet within the oil sump that prevents large size particles from being sucked into the oil pump so some of these particles would be kept out of the oil pump and others small enough to pass through the screen. If not sucked up into the pressurized oil system they are still in the crankcase where they can still be thrown around in the workings. The second device is called an oil spinner or centrifugal oil filter that sits on the end of the crankshaft and I believe it is connected to the oil pump and as oil enters by force it slings the debris out to be trapped against the sides. The spinner does need to be cleaned so often and also the screen but the oil pump screen faces out so it does not trap particles, it prevents them from entering, think of a sewing thimble shaped screen facing out. To really get the debris out the oil has to be changed. |
|
|
|
04-30-2022, 06:57 PM
|
#71 |

Join Date: Feb 2021
Location: Northeast
Posts: 929
|
I see! For some reason I thought it was set up logically. I figured the “oil filter”, which is actually a screen, yes, would be before the pick up for the pump. So that all oil from the sump had to go through it to be picked up for pumping. I guess not. It would’ve been a better design that way.
May have to pick up the magnetic plug myself. Just to get some of that metal out of there. I didn’t see very much come out on my oil changes.
__________________
2020 Lifan x-pect |
|
|
|
04-30-2022, 08:00 PM
|
#72 |
|
Join Date: Dec 2018
Location: PNW
Posts: 982
|
To clarify some, again the team are no trained motorcycle mechanics, the oiling system has two parts a "splash" system and the pressurized by an oil pump system. The rotating mechanisms pick up oil from the sump and splash it in the case and the oil pump pressurizes oil to the crank and such and it is pumped up to the top of the head. So some of the debris in this oil may never make it to the oil pump inlet and just keeps getting tossed around.
This is a new engine being broken in so we expect there to be some metal and debris. Like you, I have not noticed much metal in the oil changes on my CG motors but maybe I just never looked hard enough for it. We also expect over time for the metal to decrease. The one test on the residue showed that the magnetic drain plug may not be perfect at catching metal but it is pretty good! One test does not prove it is always that good. WARNING: Beware, the team highly recommends if you use a magnetic drain plug get one made of steel not aluminum. That yellow plug magnet you see in the above posts is a cheap aluminum drain plug that snapped off inside the case! |
|
|
|
05-01-2022, 09:13 AM
|
#73 |
|
Join Date: Sep 2021
Location: De Soto, MO
Posts: 1,868
|
Which magnetic steel drain plug do you recommend? What is the thread pitch and length? Thanks for the great work.
__________________
2021 Lifan Xpect--sold 2022 Lifan KPX 1972 Honda CT90--The Carrot 1969 Honda CT90--The Tomahto Cheesy is the WDK (workplace drama king). Now retired. Nope, back in the saddle. Climate: The Movie https://www.youtube.com/watch?v=A24fWmNA6lM How our government really works https://www.youtube.com/watch?v=QjadCd0VRBw Question all authority.....think for yourself |
|
|
|
05-01-2022, 10:40 AM
|
#74 |
|
Join Date: Dec 2018
Location: PNW
Posts: 982
|
This is the one used in the testing, appears well made and sturdy. The specs on size are in the description. Recommend you do not overtighten. We torque these to 13.6 NM or 10 ft lb but we also use some hylomar (Megadan's idea) for sealant that provides some extra holding power.
https://www.amazon.com/gp/product/B0...?ie=UTF8&psc=1 |
|
|
|
05-01-2022, 11:19 AM
|
#75 | |
|
Join Date: Sep 2021
Location: De Soto, MO
Posts: 1,868
|
Quote:
I use wheel bearing grease on the threads as a sealant on every drain plug I own, since in essence it's just ridiculously thick oil. Never had a leak. Might provide some slight extra holding power too, but IDK.
__________________
2021 Lifan Xpect--sold 2022 Lifan KPX 1972 Honda CT90--The Carrot 1969 Honda CT90--The Tomahto Cheesy is the WDK (workplace drama king). Now retired. Nope, back in the saddle. Climate: The Movie https://www.youtube.com/watch?v=A24fWmNA6lM How our government really works https://www.youtube.com/watch?v=QjadCd0VRBw Question all authority.....think for yourself |
|
|
|
|
|

|
 |
|
|


 Linear Mode

