 02-05-2019, 12:16 AM
|
#31 | |

Join Date: Mar 2009
Location: Sardis, BC, Canada
Posts: 25,977
|
Quote:
Your firefly-in-a-test-tube comment cracked me up.
__________________
Weldangrind "I figure I'm well-prepared for coping with a bike that comes from the factory with unresolved issues and that rewards the self-reliant owner." - Buccaneer |
|

|
|
02-05-2019, 11:36 AM
|
#32 |
|
Join Date: Oct 2018
Posts: 74
|
According to permatex's webpage on their ultra copper product it is sensor safe.
I actually stole and re-worded that joke from jeremy clarkson on top gear - he called the headlights on a truck he was driving "glow worms in jam jars". |
|
|
|
02-05-2019, 09:14 PM
|
#33 |
|
Join Date: Oct 2018
Posts: 74
|
I've been looking at the exhausts that other people are using with their swapped groms and croms, almost everyone is using some exhaust from kepspeed. I've only been able to find kepspeed parts on motorkit.com, but it seems as though they don't ship to the US. I tried to go through the checkout process to see how much the grand total would be, and I couldn't select the US as a shipping destination.
Is there another retailer for kepspeed that I've missed? |
|
|
|
02-06-2019, 12:14 PM
|
#35 |

Join Date: May 2013
Location: finger lakes NY
Posts: 2,042
|
wonder if a "monkey bike" exhaust would work for you? i ran a wide open megaphone style on on my pocket bike that was origilnally designed for a Z50 based bike... cant find it on ebay anymore...it was like 7 yrs ago now, but to give an idea.... had a race cam, VM26, hydro clutch....LOL went 67mph off a 110cc....
 |
|
|
|
02-06-2019, 01:27 PM
|
#36 |
|
Join Date: Oct 2018
Posts: 74
|
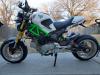
The ebay exhaust that I bought was advertised as fitting the monkey/z50. In the pictures of the actual item in the ebay listing, it doesn't show a very good view of the piece that bolts to the engine, that piece has a very... early(?) bend on it. I was looking at the picture of the exhaust that was installed on the bike - the 90 degree bend coming out of the engine looks very smooth, sweeping, and mandrel bent.
I attached a picture of a bike that obviously isn't mine that has what looks like the exact same exhaust I bought, as well as a pic of a section of the exhaust I bought. See the 90 degree bend right where the exhaust bolts to the engine? It looks like someone cut off that a bit too early, so the bend is less smooth and tucks under the engine more. Yeah, I really suck at explaining physical properties of items through text. I need that bend to be long and sweeping, not cut off. I've been looking at other dax/monkey ebay exhausts and a few look like they might clear the starter. Here are some examples. I don't think an "over" exhaust system will work with the fuel pump being on that side with no real place to move it to and the plastic fairings being in such close proximity. However, another undertail exhaust might work. I'm also going to try and return the exhaust I bought, the seller offers free returns for 30 days so I just need to buy or dig up some bubble wrap and send it back to them. Also, last night I (tried) to test fit the stock/oem exhaust system just to see if I would have that option. Nope. The exhaust pipe just touches one of the bolts on the end of the starter before the exhaust is completely bolted into the engine and frame. More also. I would have to grind away quite a bit of the rearset to make clearance for the kick starter, so I more or less HAVE TO find an exhaust that fits. Such is the life of a modder. |
|
|
|
02-06-2019, 02:20 PM
|
#37 |
|
Join Date: May 2013
Location: finger lakes NY
Posts: 2,042
|
what about something along these lines?
https://www.motorkit.com/en/exhaust/...b02-2018-.html  EDIT*** what about something like this? https://www.ebay.com/itm/Motorcycle-...frcectupt=true 
|
|
|
|
02-06-2019, 06:00 PM
|
#38 |
|
Join Date: Oct 2018
Posts: 74
|
Both of those are intended for the grom/ssr razkull - the exhaust port on those engine points straight down. The engines on the vader/boom/croms as well as the 190 point down diagonally toward the right side of the bike.
Edit: I've found something that I think may work, from aliexpress no less. It's cheaper than the equivalents on ebay, and they aren't on vacation for a month. I'm still at least a month away from a point where the temperature outside is warm enough for a ride, so waiting is no big deal and if anything it will teach me patience. I thought about the drag pipes they have, but they would definitely be too loud for me and probably not have enough pipe between the exhaust port and the muffler for a warm-but-not-hot o2 sensor placement. Nevertheless, thanks for offering your help. Last edited by glavey; 02-06-2019 at 06:27 PM. Reason: no need for two posts |
|
|
|
02-08-2019, 02:37 PM
|
#39 |
|
Join Date: Oct 2018
Posts: 74
|
I did a bit of experimentation with the ebay exhaust last night and I discovered that if I flip the mid-pipe around and connect the muffler to where the header pipe would usually go and vice-versa, I can just barely clear the starter motor and rear swing arm, but I'll still have to trim or remove the passenger foot pegs. It will still be tricky making an exhaust hanger that not only holds the muffler where it needs to be vertically, but also horizontally.
I'm at the point where anything more I need to do with the bike involves me buying something. Dielectric grease, lots of different nuts/bolts/hardware for many different things, metal vacuum nipple (still makes me giggle on the inside) for the fuel pressure regulator, o2 sensor bung, water-proof connectors, crimp tool for said connectors, fork oil, FI hose and clamps, copper tape, 8/10mm taps, you get the idea. Once the ice thaws and I can make it to a hardware store, I'll get what I can. Until then and after that, we all have to play the waiting game while watching the mercury slowly rise... Are we there yet? |
|
|
|
02-09-2019, 08:13 AM
|
#40 |
Join Date: Aug 2018
Posts: 286
|
There's a guy that goes by "BizMoto" he has done the 190 swap on his vader. look him up on U-Tube, he might mention what exhaust he went with and where he got it. If I find out I will post back on here as Im going to be doing this swap at some point as well.
__________________
2018 BD125-8-x21rs ZS190/Genuine PE28 Kepspeed GP1 Exhaust Protaper se x110 bars/grips 1/4 MotionPro throttle Kepspeed Braced swingarm Chimera rear hub assy Grom Intergrated tail light Superlite Sprockets 17/32 custom made from Japan Chimera Swing Arm Bolt RK MXZ Chain #420 All Balls wheel bearings Motodynamic fender eliminator Coremoto ss brake lines Composimo 2.5 lower link Grom Calipers-w/ebc pads/rotors Michelin tire 140&120 13x4/13x7 fatties Grom forks |
|
|
|
02-09-2019, 12:37 PM
|
#41 |
|
Join Date: Oct 2018
Posts: 74
|
Yep he's one of the people that said they used a kepspeed exhaust. I believe this is the exhaust that is on his bike. it appears to be discontinued - 9 months ago biz said it was out of stock and it still is. There is what I believe to be a successor to that exhaust system on the same site, here, but again I haven't had any luck being able to select united states as a shipping option on their website.
As much as I know it would be too loud and I wouldn't be able to use a wideband sensor, this system tingles my jingles. Oh well, I'll make the do with what I have available to me. |
|
|
|
02-09-2019, 05:32 PM
|
#42 |
|
Join Date: Aug 2018
Posts: 286
|
So basically the main issue is finding an exhaust
To clear the starter right. Sounds like it needs to be a custom job.
__________________
2018 BD125-8-x21rs ZS190/Genuine PE28 Kepspeed GP1 Exhaust Protaper se x110 bars/grips 1/4 MotionPro throttle Kepspeed Braced swingarm Chimera rear hub assy Grom Intergrated tail light Superlite Sprockets 17/32 custom made from Japan Chimera Swing Arm Bolt RK MXZ Chain #420 All Balls wheel bearings Motodynamic fender eliminator Coremoto ss brake lines Composimo 2.5 lower link Grom Calipers-w/ebc pads/rotors Michelin tire 140&120 13x4/13x7 fatties Grom forks |
|
|
|
02-10-2019, 12:10 AM
|
#43 |
|
Join Date: Oct 2018
Posts: 74
|
I have only tried the stock exhaust that came with my bike and the one I bought on ebay, there very well could be an ebay/amazon/aliexpress/you-name-it exhaust system that will work with the 190. I would go and ask the 190 swap facebook group, but I sincerely dislike facebook altogether and once they asked me to verify myself with an ID photo, I gave up on my account.
If I had the funds to test out the fitment of many different exhaust systems so you or anyone else wouldn't have to, I would. I wish I could. I am a humble being with a humble occupation, and I cannot do that. If I tally up the cost of everything I've bought on this project so far including the bike itself (granted some of it isn't needed), it comes very close to a new genuine honda grom. All I can do is tell you what to look out for, what I've learned with my exhaust, what has worked, and what hasn't. On to slightly more upbeat news, I made a fender eliminator/tail tidy/moto-thong-be-gone! I didn't get to the hardware store today, but I did the next best thing; rummaging around all of my junk boxes, tool boxes, tool chests, spare parts boxes, scrap metal boxes, and underwear drawer for useful scraps of metal stock, bolts, nuts, shiny things, etc. I found 2x large 90 degree braces probably meant for holding up shelves, 2x small braces, hardware and mounting brackets for bicycle reflectors, lots of misc. hardware, and a one-way air valve that used to be on my scooter, and probably some other stuff I'm forgetting. There are four screws holding the plastic cover over the metal frame inside the stock tail extension, remove those and the four bolts underneath the seat holding the tail extension frame in place and the tail extension will come right off. Be careful not to yank on the wires for the turn signals and the license plate light. The turn signals come out after you remove the nut securing them in place. The license plate light is behind about 2 or three pieces of plastic just screwed into place. I bolted the two larger braces into the two rear former-tail-extension mounting holes. I had to drill two new 1/4" holes in the folded metal piece that holds the red reflectors. I also had to (eep) drill two new holes in my license plate so I could use the two same mounting bolts for everything. The holes in no way obscure the license numbers or the reg sticker, they are just about 3/8" inward from the "standard" holes. Where the reflectors used to be held, I drilled out the holes to a little over 3/8" and put the turn signals in there. I mounted the red reflectors on the two smaller braces, which I mounted to the bottom two holes on the license plate. I wanted to keep the one red reflector that faced straight backward, so I bent one of the bicycle reflector mounts into an "L" shape and bolted one end to an area on the undertail plastics that looks like it was meant to hold a bolt or a screw, and attached the reflector to the other end, facing backward, a little behind the license plate. For less than about $10 worth of scrap pieces from previous projects, I think that looks pretty good. I will eventually paint the braces black. I got the silicone out again and REALLY sealed the MAP/IAT/TPS box, as well as went around the injector housing. I'm not sure exactly where the air leak is, but it needs to be gone. I wish I could blow some smoke through the throttle body or submerge it in water to see where the air is coming out, but I don't think that little black box would appreciate being smoked out or dunked in water. I could just take the black box off and try testing the TB without it, but that would screw up the TPS-zero and TPS-100% readings in the tuning software, as well as in the firmware on the ECU. I know how to fix and correct that, but I'm just going to leave well enough alone for now. I connected the crankcase breather tube to the engine and added a one-way valve to the end of it so the air in the crankcase will always be at least at atmospheric pressure, if not lower, so oil won't get pushed out of any seals when there's a lot of blow-by. I routed the outlet tube from the one-way valve down toward the left side of the rear swing arm, out of the path of the rear tire. If any oil or oily-gasses escape and make it all the way out to there, they will fall onto either the ground or onto the chain. I don't think motor oil can hurt a motorcycle chain. The white spiral wire wrap is so the tubing does't kink at that tight 180 turn. I found an old but still in very good condition small section of very large gauge wire I am going to use to ground from the engine to the frame. Right now I am relying on the mechanical connection of the engine's mounting holes and the frame's mounting tabs for an electrical connection between them. I works for now, but I don't want to rely on it long term. I'll probably bolt it up to the frame where I took a picture of it with a bolt on the engine right next to an unoccupied bolt hole in the frame, unless I can find a better place. I also de-glazed my front brake rotor with a scotch-brite pad. I usually rely on engine braking for the first half of my braking force, and then use the front and rear brakes for whatever speed is left thereafter. So, the front and rear brakes get only light to moderate use, which ended up polishing the rotor instead of bedding the pads and rotor together. No biggie, neither the rotor or the pads are ruined if this happens, just scuff up the rotor with fine-grit (about 200 or more) sandpaper or a scotch-brite pad until the glaze is gone. You will have to press rather hard while scrubbing. Things done: (some not talked about)
|
|
|
|
02-10-2019, 01:48 AM
|
#44 |
|
Join Date: Aug 2018
Posts: 286
|
Looking good. Looks like your almost done. Will then have to find a new project.
__________________
2018 BD125-8-x21rs ZS190/Genuine PE28 Kepspeed GP1 Exhaust Protaper se x110 bars/grips 1/4 MotionPro throttle Kepspeed Braced swingarm Chimera rear hub assy Grom Intergrated tail light Superlite Sprockets 17/32 custom made from Japan Chimera Swing Arm Bolt RK MXZ Chain #420 All Balls wheel bearings Motodynamic fender eliminator Coremoto ss brake lines Composimo 2.5 lower link Grom Calipers-w/ebc pads/rotors Michelin tire 140&120 13x4/13x7 fatties Grom forks |
|
|
|
02-10-2019, 09:51 PM
|
#45 |
|
Join Date: Oct 2018
Posts: 74
|
At this point I'm so bolts and nuts deep into this project, I can't see anything else when I'm falling asleep but fuel tables and wiring harnesses. I have no idea what the future will provide me as a project.
I decided to use the shifter arm that came with the 125 engine. The one that came with the 190 was poorly welded and just waiting to break off when I'm 50 miles from home or a hardware store. I may keep it with the bike as a roadside-backup, it's pretty small and lightweight, why not? The shifter that was on the 125 is also about 1 1/2" shorter than the 190's. If I have to put too much effort into the shifts because of the lower MA, I'll just buy a new one off of ebay. I wanted to know how much all of the stuff I've taken off of the bike weighed and compare the exhaust that I'm hopefully going to be installing in its place. By my hasty calculations, everything I've taken off weighs about 15 lbs and the new exhaust weighs about 4 lbs, so a net bike weight loss of about 11 lbs! Unfortunately, thanks to a new medicine I've been prescribed, I've gained more than that over the last ~6 months. Time to go back on a diet. Maybe. The silicone on the MAP/IAT/TPS sensor still hasn't fully cured, and probably won't for a few more days; I think I went over the maximum recommended thickness by a factor of at least 2 or 3. The short section of heavy-gauge wire I found turned out to be too short, so I had to substitute a ground wire previously used on an amplifier. It's 12 gauge, so more than enough to return the power used by one of the relays and the ignition coil. Not much else to say for tonight... |
|
|
|
|

|
 |
|
|


 Linear Mode

