 08-10-2016, 03:51 PM
|
#16 |
Join Date: Sep 2014
Location: Arvada, CO
Posts: 1,004
|
Long term review of the CSC skidplate
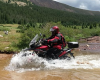
I've had CSC's aluminum skidplate since 10/15 and since I gave it a beating on the Webster Pass trip, I thought it deserved a long term review.
To cut to the chase, this was a great addition to my RX3 and it has really saved my butt a couple of times. Mostly it just had to deflect a few small rocks thrown up by the front wheel. But when I needed the protection, it did the job. Protection The protection is really excellent. Each time I've taken a hit, the bike survived without any damage. It's really strong. I've bottomed out on a few boulders, got high-centered once on a ditch (while I pitched forward over the handlebars), and even hit a cut off steel post that was hiding in plain sight. The steel post left a mark, but aside from that and a few scratches, it looks almost new. The protection is probably overkill for pavement and graded dirt. But if you plan to hit any rocky trails at all, I highly recommend the CSC skidplate. Another aspect of protection is staying out of the way. Unlike the stock skidplate, CSC skidplate mounts flush to the bike frame. This gives you about 1/2 inch in ground clearance, helping you avoid hits offroad. It also deflects dirt and keeps the front of the bike clean. Installation I won't rehash the installation process, but I will note that the upper bracket has rattled loose on mine, causing vibration on road and off. Retorqueing the bolts fixes the rattle, but the bolts aren't easy to reach, so it's kind of a pain. Service and Removal The upper bracket hooks onto a square bar that runs between the frame bars. The bracket is square too, and it holds the skidplate firmly in place, so you can't just swing it out of the way for service. As it is, the main oil drain bolt is in the open, but cleaning and draining the two other mesh filters from the side makes a mess on the skidplate. No big deal really, but I don't like drips. It would be nice to swing it out of the way. Note: For 2017, it would be nice if the RX3 changed to round bar stock instead of square for this crossbar. It would make installation and service with the CSC skidplate much easier. First, the bracket could be riveted to the skidplate instead of bolted, avoiding the difficult reach to those bolts. After removing the stock plate and brackets, you would just need to hook the bracket on the round bar, swing the new skidplate down and tighten the rear bolts. Lifting the bike One nice thing about the CSC skidplate is the flat, even surface, which is great for lifting the bike. Lifting my RX3 is very stable with my Harbor Freight motorcycle lift, thanks to that flat surface.
__________________
Red 5 standing by! 2015 CSC red RX3 with 19" front wheel, Shinko 804/805, skid plate, tall seat, 13T/45T sprockets, progressive shock, Winyoochanok windshield, GENSSI LED headlight, SW-Motech tankbag, Shorai Lithium battery 2014 Ural Patrol |

|
|
08-10-2016, 04:15 PM
|
#17 |
|
Join Date: Feb 2016
Location: Portsmouth, Virginia, USA
Posts: 632
|
I have removed the aluminum skid plate a few times. I use a 3/8" drive universal joint to get at the front bolts. It's still a less than ideal setup but I find that I can reach each bolt (one from the left side of the engine, the other from the right side). Since the nuts are self locking I don't try to put a lot of torque on them. Soon I'll need to replace the nuts as the nylon locking feature won't last forever. On my bike the left rear mounting bolt is a challenge. My crash bar on that side is not an exact fit so it always requires some 'encouragement'. Nevertheless, the plate is well worth what it cost and the minor aggravation.
Peter Y. |
|
|
|
08-11-2016, 02:39 AM
|
#18 |

Join Date: Oct 2015
Location: Berthoud, CO
Posts: 205
|
On my skid plate the front bolts/studs were installed such that the nuts were on the engine side and were difficult to reach. After checking the dimensions I pressed the studs out of the skid plate and into the bracket. Much easier to remove now.
__________________
Dan CSC RX3 Cyclone, CSC TT250, Moto Guzzi V7 II, KLR650 |
|
|
|
08-11-2016, 02:42 AM
|
#19 | |
|
Join Date: Sep 2014
Location: Arvada, CO
Posts: 1,004
|
Quote:
__________________
Red 5 standing by! 2015 CSC red RX3 with 19" front wheel, Shinko 804/805, skid plate, tall seat, 13T/45T sprockets, progressive shock, Winyoochanok windshield, GENSSI LED headlight, SW-Motech tankbag, Shorai Lithium battery 2014 Ural Patrol |
|
|
|
|
09-11-2016, 05:33 PM
|
#20 | |
|
Join Date: Aug 2015
Location: Taos
Posts: 104
|
Quote:
gary |
|
|
|
|
09-14-2016, 12:48 AM
|
#21 |
|
Join Date: Oct 2015
Location: Berthoud, CO
Posts: 205
|
The nuts are on the front side.
To "press" the studs out and back in support the plate with an appropriately sized socket and tap with a hammer. 
__________________
Dan CSC RX3 Cyclone, CSC TT250, Moto Guzzi V7 II, KLR650 |
|
|
|
09-14-2016, 06:01 PM
|
#22 | |
|
Join Date: Aug 2015
Location: Taos
Posts: 104
|
Quote:
thanks gary |
|
|
|
|
09-15-2016, 01:24 AM
|
#23 | |
|
Join Date: Oct 2015
Location: Berthoud, CO
Posts: 205
|
Quote:
The studs are PEM studs; they have a small feature that holds them in place and a flange that keeps them from pulling thru. They will push out easily. When removing them, support the plate with a socket under the stud that has an ID a bit larger than the flange. When re-installing the stud, support the plate with a socket a bit larger ID than the stud and with enough depth that the stud will not bottom out. You don't have to get the flange flush, just enough to hold it in place.
__________________
Dan CSC RX3 Cyclone, CSC TT250, Moto Guzzi V7 II, KLR650 |
|
|
|
|
09-15-2016, 04:42 AM
|
#24 |
Join Date: Apr 2016
Location: South Mississippi
Posts: 253
|
You take the Skidplate off the bike first. Set the plate down on top of the socket, so it will act as a receiving and/or stabilizing sleeve and tap the stud out into the socket.
Is that about right? |
|
|
|
09-16-2016, 01:59 AM
|
#26 |
|
Join Date: Sep 2014
Location: Arvada, CO
Posts: 1,004
|
This is good stuff, Dan. I actually just removed and painted my skid plate with bed liner a few days ago. Before I do the second coat, I'll try your mod. Should make reinstallation easier.
I'm painting it mostly for noise reduction. I think the plate reflects a bit of engine noise and may be rattling a little too. The bed liner might help with both. And if not, black is cool.
__________________
Red 5 standing by! 2015 CSC red RX3 with 19" front wheel, Shinko 804/805, skid plate, tall seat, 13T/45T sprockets, progressive shock, Winyoochanok windshield, GENSSI LED headlight, SW-Motech tankbag, Shorai Lithium battery 2014 Ural Patrol |
|
|
|
12-15-2016, 01:14 PM
|
#28 |
|
Join Date: Aug 2015
Location: Taos
Posts: 104
|
Installed the other day. Very simple with PEM studs removed from actual skidplate and attached to holding bracket. Now nuts on outside and easy to get to. Thanks Dan at redhawk for tip. The studs just tap out of skidplate and tap into holes on the holding bracket. Helps to first put the nut on the threads so you have something to tap on, rather than the stud threads.
|
|
|
|
|

|
 |
|
|


 Linear Mode

