 04-18-2015, 10:45 PM
|
#2956 |
|
Join Date: Mar 2015
Location: in a truck
Posts: 116
|
 , Jim. I hate front end dive when braking, and tend to kiss the inside mirror when dragging footpegs and such on pavement, so I'm going to try some 1-inch spacers to preload the springs if there won't be any coil bind and some 7.5w fork oil while setting the bike up. Once the suspension is broken in I'll be going through it, anyway. , Jim. I hate front end dive when braking, and tend to kiss the inside mirror when dragging footpegs and such on pavement, so I'm going to try some 1-inch spacers to preload the springs if there won't be any coil bind and some 7.5w fork oil while setting the bike up. Once the suspension is broken in I'll be going through it, anyway.That JC Whitney top box is smaller than the Rubbermaid luggage on Tdub. I agree with SpudRider, better to have the storage when you need it than need the storage and not have it.
__________________
"Thou shall not Zong" is not a commandment. |

|
|
04-19-2015, 01:57 AM
|
#2957 | |

Join Date: Sep 2014
Posts: 175
|
Quote:

__________________
Honda CB300R ABS |
|
|
|
|
04-19-2015, 05:57 AM
|
#2958 |
|
Join Date: Jan 2015
Location: Northern Virginia
Posts: 144
|
Congratulations Joe!
At long last, congratulations on your new RX-3! Looks awesome! You're also in a great position to assess the merits of the 17 inch rear wheel. Happy riding!
|
|
|
|
04-19-2015, 06:39 AM
|
#2959 | |

Join Date: Jan 2015
Location: England
Posts: 382
|
Quote:
Have most of my bolts and nuts marked up for easy visual inspection. I used Tipp-Ex correction fluid as its easy to remove and re apply. Worth doing as I had the front axle lock nut loosen off a bit. "Food for thought" on chain tension A while back I dropped the lower link on the rear shock so I could inspect the chain tension with the swinging arm horizontal to its pivot. It was pretty damn tight. This was with the chain adjusted on side stand with an inch of slack at its tightest spot.(adjusted the standard way not as image below) So I would suggest if you plan on riding with a heavy load, pillion or off road to do the same and check this for yourself. Negative image  I read this as the measurement between the swinging arm and chain |
|
|
|
|
04-19-2015, 09:17 AM
|
#2961 |
|
Join Date: Mar 2015
Location: in a truck
Posts: 116
|
Chain adjustment seems to be critical. Haven't had a motorcycle yet that was immune to poor adjustment. Typically, too tight causes hard shifting and worn seals and bearings on the countershaft. Too loose causes false neutrals, jerky shifts, and clunky transitions between the wheel being driven by the engine and the wheel driving the engine (compression braking).
First chain adjustment during set up is a drawn out process. I always check for a true arc in swing arm travel (bought one bike with a misaligned frame), that the sprockets and chain all lign up (some sprockets have inset hubs that can move the teeth 3-5mm to the side if installed improperly), and the chain adjustment marks line up to keep the wheels aligned. I support the swingarm with jacks (2x4s cut to length) with the tire just off the ground, then use straps to load the suspension until the chain is at its tightest. I have a motorcycle lift so I can use straps, but you can also simply load the back of the bike with tools or a couple friends or whatever. Adjust the chain until it starts to drag (you can feel the drag when slowly turning the wheel), then back off 5mm or so until the drag goes away. Watch the chain slack as you turn the wheel slowly. You'll see the chain tighten and loosen as the wheel goes around. This is normal as sprockets are not usually round because a perfectly round sprocket can cause all kinds of annoying harmonics and such. I make a mark on the sprocket with a Sharpie so I know where the tight spot is in the future. I prefer to adjust the chain on the tight spot. Find the tightest spot on the sprocket. Adjust the chain so it is not quite too tight. Make sure the sprockets, chain, and wheel are in alignment with each other and note if the adjustment marks on the swingarm are correct or not. Doesn't really matter if they don't match, simply account for the mismatch when adjusting the chain in the future. Lots of bikes out there with mismatched adjustment scales. Makes a difference with handling. Now unload the bike and set it on its stand. Note the chain slack. For adjusting the chain on the stand with the bike unloaded, that's where you want it to be. When prepping for a trip I do a complete service, load the bike, and note the slack on the stand with the sprocket at the tight spot. A loaded bike will usually have slightly less slack in the chain while on the stand than an unloaded bike. Once you've been through the process and know what your bike's slack and axle alignment should be, it's a simple matter to roll the bike until the chain slack is at a minimum (tight spot on the sprocket), then eyeball the chain slack and axle alignment with the bike on its own stand as one normally would.
__________________
"Thou shall not Zong" is not a commandment. |
|
|
|
04-19-2015, 11:31 AM
|
#2962 | |

Join Date: Jul 2008
Location: Idaho
Posts: 25,054
|
Quote:
 I don't have any problems with my fork seals, as long as I clean the inner fork tubes regularly with a hose. I think the Neoprene Fork Seal Savers make this job tougher, and also make it harder to detect leaks.
__________________
Spud "Never argue with an idiot. He will drag you down to his level, and beat you with experience."  Mark Twain Mark Twain2015 Zongshen ZS250GY-3 (RX3) 2006 Zongshen ZS200GY-2 (Sierra 200) 2005 Honda XR650L 2004 Honda CRF250X 1998 Kawasaki KDX220 Mods made to my Zongshen ZS200GY-2: http://www.chinariders.net/showthread.php?t=6894 |
|
|
|
|
04-19-2015, 12:01 PM
|
#2963 | |
|
Join Date: Jan 2015
Location: England
Posts: 382
|
Quote:
 It's thinking of some way to prevent stone chips without having the fork guards on  , Just like the look without them , Just like the look without them @ oldqwerty Nice tutorial, some good tips
|
|
|
|
|
04-19-2015, 12:02 PM
|
#2964 | |

Join Date: Mar 2009
Location: Sardis, BC, Canada
Posts: 25,977
|
Quote:
For anyone interested, this is the link he provided for stainless braided hose: http://item.taobao.com/item.htm?id=39034462085
__________________
Weldangrind "I figure I'm well-prepared for coping with a bike that comes from the factory with unresolved issues and that rewards the self-reliant owner." - Buccaneer |
|
|
|
|
04-19-2015, 12:03 PM
|
#2965 | |
|
Join Date: Jul 2008
Location: Idaho
Posts: 25,054
|
Quote:
The information plate on the swingarm is misleading, since it shows the distance between the chain and swingarm, rather than the total chain movement.  The CSC tutorial on this subject shows a better way to measure the actual chain movement, and the total chain slack. http://californiascooterco.com/blog/?p=15160 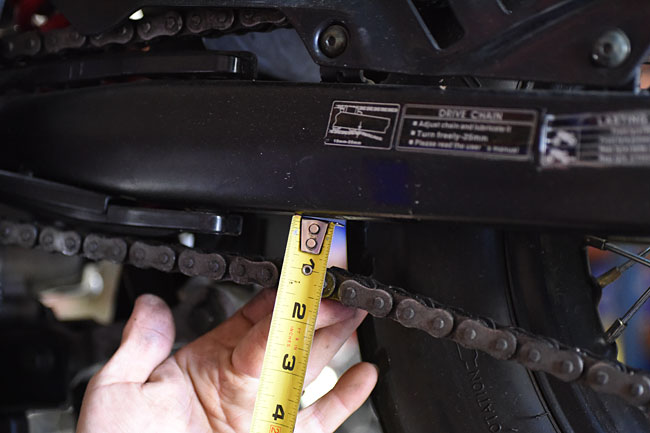 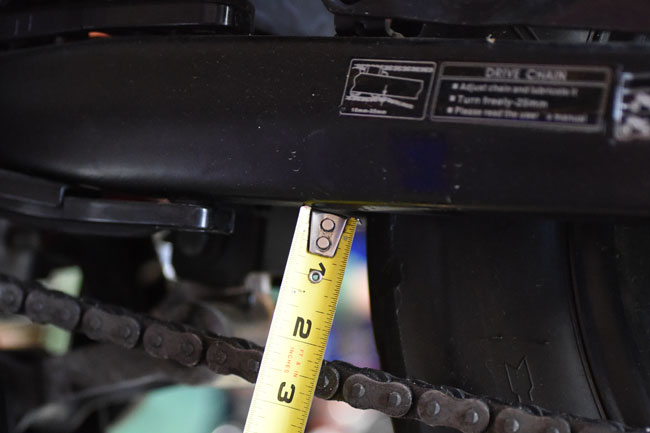 Qwerty gave an excellent, detailed explanation of the definitive method for determining the proper chain slack. Of course, your method of removing the dogbone/link from the lower shock linkage works just as well. Once again, please note, the information plate on the Zongshen swingarm doesn't specify chain slack. Instead, it specifies a distance between the drive chain and the swingarm, when the drive chain is pushed up against the swingarm.  In my opinion, the distance shown is incorrect. Using this method to check the drive chain tension, I want to be able to hold the lower part of the chain against the swingarm, without any gap. At the same time the top of the drive chain should be taut, without a lot of slack. This method is just a quick way to get a ballpark estimate of the proper slack required in the drive chain. Qwerty's method is the definitive method of determining the proper slack. Your method of removing the dogbone from the lower shock linkage also works well.
__________________
Spud "Never argue with an idiot. He will drag you down to his level, and beat you with experience." Mark Twain2015 Zongshen ZS250GY-3 (RX3) 2006 Zongshen ZS200GY-2 (Sierra 200) 2005 Honda XR650L 2004 Honda CRF250X 1998 Kawasaki KDX220 Mods made to my Zongshen ZS200GY-2: http://www.chinariders.net/showthread.php?t=6894 |
|
|
|
|
04-19-2015, 12:04 PM
|
#2966 | |
|
Join Date: Jul 2008
Location: Idaho
Posts: 25,054
|
Quote:
__________________
Spud "Never argue with an idiot. He will drag you down to his level, and beat you with experience." Mark Twain2015 Zongshen ZS250GY-3 (RX3) 2006 Zongshen ZS200GY-2 (Sierra 200) 2005 Honda XR650L 2004 Honda CRF250X 1998 Kawasaki KDX220 Mods made to my Zongshen ZS200GY-2: http://www.chinariders.net/showthread.php?t=6894 |
|
|
|
|
04-19-2015, 12:09 PM
|
#2967 | |
|
Join Date: Mar 2009
Location: Sardis, BC, Canada
Posts: 25,977
|
Quote:
__________________
Weldangrind "I figure I'm well-prepared for coping with a bike that comes from the factory with unresolved issues and that rewards the self-reliant owner." - Buccaneer |
|
|
|
|
04-19-2015, 12:17 PM
|
#2968 |
|
Join Date: Jan 2015
Location: England
Posts: 382
|
Got a bit keen with the oil today and over filled
 But rather than play with the sump plug to drain a bit off, where it can go either way, just the right amount or all of it  Turned out its possible to get a thin plastic tube in through and down the filler hole, the one with screwdriver slot that sits above the clutch, and suck it up, block, take it out and release a tube full of oil. Tastes great  , nah , use a clear plastic tube so you can see where the oil is at. top bodge , nah , use a clear plastic tube so you can see where the oil is at. top bodge
|
|
|
|
04-19-2015, 12:18 PM
|
#2969 | |
|
Join Date: Jul 2008
Location: Idaho
Posts: 25,054
|
Quote:
However, I suggest you keep them very clean. Also, I suggest you lower them occasionally to inspect for leaks from the fork seals. Some of these covers have velcro strips in the back so you can install them easily, and remove them easily for proper cleaning. You might also consider the conventional, accordion fork boots. You can choose from a wide variety of sizes and colors. http://www.daystarmx.com/productlist...cat=Fork+Boots 
__________________
Spud "Never argue with an idiot. He will drag you down to his level, and beat you with experience." Mark Twain2015 Zongshen ZS250GY-3 (RX3) 2006 Zongshen ZS200GY-2 (Sierra 200) 2005 Honda XR650L 2004 Honda CRF250X 1998 Kawasaki KDX220 Mods made to my Zongshen ZS200GY-2: http://www.chinariders.net/showthread.php?t=6894 |
|
|
|
|
04-19-2015, 12:19 PM
|
#2970 | |
|
Join Date: Jul 2008
Location: Idaho
Posts: 25,054
|
Quote:
Thanks once again, Humanbeing.
__________________
Spud "Never argue with an idiot. He will drag you down to his level, and beat you with experience." Mark Twain2015 Zongshen ZS250GY-3 (RX3) 2006 Zongshen ZS200GY-2 (Sierra 200) 2005 Honda XR650L 2004 Honda CRF250X 1998 Kawasaki KDX220 Mods made to my Zongshen ZS200GY-2: http://www.chinariders.net/showthread.php?t=6894 |
|
|
|
|
|

|
 |
|
|


 Linear Mode

