 12-22-2022, 08:54 AM
|
#31 | |

Join Date: Feb 2021
Location: Kansas City
Posts: 2,225
|
Quote:
|
|

|
|
12-22-2022, 12:48 PM
|
#32 | |

Join Date: Nov 2022
Location: Dallas TX
Posts: 578
|
Quote:
If you want the optimal range: 1 1/4 and 2 1/4 turns out if your motor is behaving as it should be between these ranges (Step 2. in full carburetor tuning post) then you have the correct pilot jet size. If you want a process to do a full carburetor tuning: https://chinariders.net/showthread.php?t=31995
__________________
2022 1/2 Templar X 250 - 6 gear model - 13 Front / 40 Rear Sprockets - #42 / #120 Jets - 1mm thick nitrile O-ring needle shim (removed) - Kenda K761 Dual Sport Tires - Sedona Standard Thickness Inner Tubes - Stock OEM battery, carburetor, spark plug still going strong - https://youtu.be/dhAYEKH-jFQ |
|
|
|
|
12-22-2022, 09:30 PM
|
#33 | |
Join Date: Nov 2022
Location: Pennsyltuckey
Posts: 291
|
Quote:
I tested the new signals on the battery and they work properly so the new relay should do the job.
__________________
22 Templar 250 |
|
|
|
|
12-22-2022, 09:43 PM
|
#34 | |
|
Join Date: Nov 2022
Location: Pennsyltuckey
Posts: 291
|
Quote:
__________________
22 Templar 250 |
|
|
|
|
12-23-2022, 03:44 AM
|
#35 | |
|
Join Date: Feb 2021
Location: Kansas City
Posts: 2,225
|
Quote:
It sounds like the relay is drawing too much current, dropping the voltage. Yup, needs new relay. Makes sense! OH... Maybe the voltage is down on the battery. That could cause this too. It should read at least 12.5V, more like 13.2V if charged. I got a Weize YTX5L-BS which fits perfectly, edge to edge in the battery cradle. It has more CCA too. There are probably others with same dimensions. Or try charging your existing battery. Last edited by Thumper; 12-23-2022 at 10:51 AM. |
|
|
|
|
12-23-2022, 07:36 PM
|
#36 | |
|
Join Date: Nov 2022
Location: Pennsyltuckey
Posts: 291
|
Quote:
I got everything back together and the only thing I forgot was the little crush washer on the choke where it mates with the carb and to take photos. I'll put it back on the next time I have things apart. I had two disappointing surprises during disassembly/reassembly. The left side tapped hole in the rear subframe where the rear taillight support frame attaches was stripped and the idle screw is hidden behind and tight against the frame making it very difficult to adjust. The stripped threads are an easy fix but the idle screw will always be a PITA. Despite the problems, I like it more and more. Now all I need is some 40*+ days to ride it!
__________________
22 Templar 250 |
|
|
|
|
12-23-2022, 08:07 PM
|
#37 | |
|
Join Date: Feb 2021
Location: Kansas City
Posts: 2,225
|
Quote:
|
|
|
|
|
12-31-2022, 02:01 AM
|
#38 | |
|
Join Date: Nov 2022
Location: Pennsyltuckey
Posts: 291
|
Quote:
I normally don't ride much below 50* but since the bike is new and the warranty short, I'm making an exception this winter. I'd like to ask another opinion on a new issue. My signals, tail lamp and plate holder are part of a small subframe member that bolts to the seat subframe with M6 bolts threaded directly into the square tubing. On my bike there are 2 bolts on the right side and one on the left. The left one is stripped and I was going to drill it larger and tap it for an M8 bolt. However considering how thin walled that rear subframe is I am leaning toward using rivnuts instead. I already have the new M8 bolts and tap and also ordered SS M6 rivnuts from Amazon. I haven't used rivnuts much before and am unsure if this is a good application for them. Thoughts? BTW, I'm liking this Templar more and more! Great engine! I had forgotten how squirrely it can get on just thawed ground/mud. I was sideways today but managed to stay wheels down and clean. 
__________________
22 Templar 250 |
|
|
|
|
01-02-2023, 11:21 PM
|
#39 |
|
Join Date: Nov 2022
Location: Pennsyltuckey
Posts: 291
|
I finally took some photos tonight. Here she is, Mei Lien. I apologize for her appearance, she's a dirty girl. Just ignore the clutter, I'll get some better pics up soon.
__________________
22 Templar 250 |
|
|
|
01-02-2023, 11:31 PM
|
#40 |
|
Join Date: Nov 2022
Location: Pennsyltuckey
Posts: 291
|
Any suggestions on how to dull the black plastic panels without leaving swirl marks is appreciated. Maybe scotch brite pads? soft scrub? It's just a bit too glossy and shows dirt and finger prints too much. TIA
BTW, I ordered the black/orange Acerbis skid plate from Zapkin's Templar M skid plate thread. I hope it fits and isn't too hard to mount. I'm planning to use 1" aluminum bar stock to fabricate mounts. Maybe I'll snap some pics of the process.
__________________
22 Templar 250 |
|
|
|
01-16-2023, 11:41 PM
|
#41 |
|
Join Date: Nov 2022
Location: Pennsyltuckey
Posts: 291
|
Another update: I did go with stainless steel M6 nutserts in the frame to mount the rear license plate/tail light frame. For whatever reason the factory had drilled and tapped 3 holes instead of 4 in the seat subframe. None of the holes had adequate thread engagement and would have failed eventually. The SS M6 nutserts were cheap from Amazon and easy to install with a 12.9 M6*30 hex head bolt, two washers and a M6 nut. I had to buy a 9mm (23/64") drill bit but wish I had used 11/32" instead as the nutserts wanted to spin in the holes. I would suggest drilling the smaller 11/32 hole and pressing the nutserts in with vice grips or a C clamp. Since I needed another fastener I bought 4 new allen socket headed M6*20 stainless bolts. Sorry for the lack of photos.
Carb is re-jetted. 125 main, 42 pilot and 2 turns out on the idle mixture seems pretty close and so much better than oem. While I had everything apart I oiled the air filter with Maxis air filter oil. I also adjusted the chain which was loose. I plan to clean it and give it a gear oil bath at the break-in oil change coming soon. I added several turns of preload to the rear shock spring which helped a lot. Lots of little tweaks here and there. Just need some warmer weather to finish breaking it in.
__________________
22 Templar 250 |
|
|
|
01-18-2023, 10:42 AM
|
#42 |
|
Join Date: Dec 2022
Location: Auburn, NH
Posts: 20
|
Freddy, it looks like you are the Templar authority so far on this forum. And Hancadam said he ordered one last month. I put a layaway deposit on one yesterday to lock in the $1399 price. Don't really want to get into building one until spring is here. Thank you to you and Thumper for the response in the Templar X thread. I was asking if I should go with the standard or the X version. Question: What hand guards did you put on and would you recommend them?
|
|
|
|
01-18-2023, 07:35 PM
|
#43 | |
|
Join Date: Nov 2022
Location: Pennsyltuckey
Posts: 291
|
Quote:
I highly recommend these handguards for the price. They fit very well and are dirt cheap. I'd rather have Acerbis guards but doubt that they're worth more than twice the cost.
__________________
22 Templar 250 |
|
|
|
|
02-20-2023, 12:26 PM
|
#44 |
|
Join Date: Nov 2022
Location: Pennsyltuckey
Posts: 291
|
Lift strap
The only good spot to lift the rear of the Templar is directly above the muffler and eventually you will get burned. It needs a lift strap and I found the perfect strap at Amazon. You'll need longer bolts (M6x25) to attach it. I chose allen head ss with ss M6 washers.
__________________
22 Templar 250 |
|
|
|
02-20-2023, 07:56 PM
|
#45 |
|
Join Date: Nov 2022
Location: Pennsyltuckey
Posts: 291
|
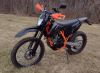
New pics!
I finally took some pics of my Templar outside of the garage. Unfortunately the light today was shitty but the background scenery is better than my crowded garage.
__________________
22 Templar 250 |
|
|
|
|

|
 |
|
|


 Linear Mode

