|
|
 12-24-2015, 01:54 PM
|
#1 |

Join Date: Apr 2015
Posts: 366
|
Ugh. I have the valve covers off and 3 valves seem too tight but I can't seem to budge the valve lock nuts. Using an 8mm combo wrench. Just what direction should I be turning looking down from the top?
|

|
|
12-24-2015, 02:05 PM
|
#2 |

Join Date: Jul 2008
Location: Idaho
Posts: 25,054
|
The tappets have a conventional thread. Looking from the top, turn counter-clockwise (left) to loosen the lock nuts.
Good luck with your valve adjustment.  Be patient, and take your time. The job will certainly go much faster the next time you do it. I'll be checking in periodically to see if you have more questions. Be patient, and take your time. The job will certainly go much faster the next time you do it. I'll be checking in periodically to see if you have more questions. 
__________________
Spud "Never argue with an idiot. He will drag you down to his level, and beat you with experience." Mark Twain2015 Zongshen ZS250GY-3 (RX3) 2006 Zongshen ZS200GY-2 (Sierra 200) 2005 Honda XR650L 2004 Honda CRF250X 1998 Kawasaki KDX220 Mods made to my Zongshen ZS200GY-2: http://www.chinariders.net/showthread.php?t=6894 |
|
|
|
12-24-2015, 02:40 PM
|
#3 |
|
Join Date: Sep 2014
Location: Orange County, CA
Posts: 410
|
Woodland sprite... I'm sure you've got it covered, but wanted to just say it (just in case) that all load be off the valve before you try to loosen the locking nut. (i.e. you should be able to wiggle the valve tappet slightly.)
Spud is correct... "lefty loosey, righty tight." It may be a bit tough to loosen, but if having difficulty, using another wrench (or hammer) on the wrench to tap lightly will help to loosen. Just don't round-off the nut! Good luck! |
|
|
|
12-24-2015, 10:18 PM
|
#4 |
|
Join Date: Jan 2015
Location: Phoenix, AZ
Posts: 267
|
Sprite, it you're using a combo wrench then you're not able to generate enough torque to overcome the production tightening. You should be able to get a socket on the nut, then use a breaker bar to loosen. Do not use a breaker bar to tighten, use a torque wrench if possible or get a feel for the torque on another nut then use your socket set to replicate. Good luck.
__________________
George 2016 CanAm Spyder F3-L |
|
|
|
12-25-2015, 12:12 AM
|
#5 |

Join Date: Jul 2015
Location: Milpitas, CA. USA
Posts: 775
|
TDC indication.
I'd gotten tired of looking in to the hole in the alternator cover for the mark and remembered that the cam timing marks are easily viewed through the screw plugs in the head.
 By watching for the "L" mark in the rear (intake) hole, you know you are just about to see the "R" mark in about 90 degrees crank rotation. http://www.chinariders.net/showpost....16&postcount=5 Third picture down. Note,,,,,,, they're not really yellow. |
|
|
|
12-25-2015, 12:55 AM
|
#6 |
|
Join Date: Apr 2015
Posts: 366
|
Thanks everyone
I thought for a while I was going to have to come in here and post a plea to try to bribe AZRider into giving me a hand :P Managed to get my hands a little dirty today without breaking a nail 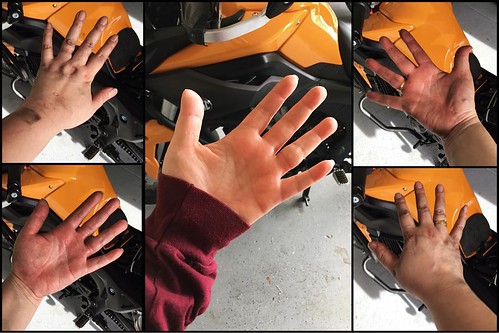 Got the bike apart, managed to dribble gasoline all over various things while the tank was upside down (didn't manage to siphon it completely dry) - luckily I remembered to buy vacuum caps so I could flip it back over after plugging the gas lines outputs. I did manage to break the retaining tab on the bigger electrical connector - could not get it to release, then when I tried to "encourage" it by prying it up a little, it snapped. The connector seems to fit fairly snugly, so I didn't do anything to try to secure it better (I suppose I could have deployed some self fusing tape). I wound up taking the feelergages out of the housing because they were a right pain in the you know what trying to get to the valves at the front of the bike. Speaking of which, those were THE WORST to try to get to what with the radiators constantly getting in the way. I did not reseat the valve cover bolts with a torque wrench, but I did try to tighten them relatively snugly...the rear ones went on easily with a T handled wrench, the front ones...I managed to finally get a socket on them. As for the valve lock nuts, I was never able to get a socket on the front ones - the rear ones were reachable with the t-handled wrench if I remember right - I was seriously worried I was going to round them off the way it was going! If anything, my valves might be a hair loose now, but I *think* 3 of them were on the tight side - either that or I was having issues with the feeler gauges catching on something. buttoned the bike back up and made sure it started didn't get a chance to take it out for a ride - husband noted there was a lot of traffic (and likely distracted drivers) out this afternoon, so I didn't go for a test drive after I put everything back together.Here's the proof that I finally got inside the bike 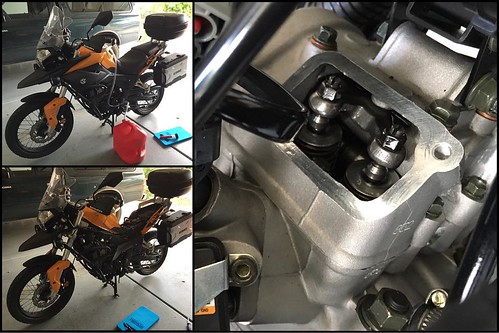 Thanks again for being so helpful and supportive - it was an interesting day getting intimate with my zong 
|
|
|
|
12-25-2015, 01:03 AM
|
#7 |
|
Join Date: Jul 2015
Location: Milpitas, CA. USA
Posts: 775
|
Brava!
Ya done good, Kiddo!
|
|
|
|
12-25-2015, 03:50 AM
|
#8 | |
|
Join Date: Jul 2008
Location: Idaho
Posts: 25,054
|
Quote:
 It is not only easier, but you will never make a mistake by adjusting the valves on the exhaust stroke, instead of the compression stroke. It is not only easier, but you will never make a mistake by adjusting the valves on the exhaust stroke, instead of the compression stroke. 
__________________
Spud "Never argue with an idiot. He will drag you down to his level, and beat you with experience." Mark Twain2015 Zongshen ZS250GY-3 (RX3) 2006 Zongshen ZS200GY-2 (Sierra 200) 2005 Honda XR650L 2004 Honda CRF250X 1998 Kawasaki KDX220 Mods made to my Zongshen ZS200GY-2: http://www.chinariders.net/showthread.php?t=6894 |
|
|
|
|
12-25-2015, 01:35 PM
|
#9 |

Join Date: Aug 2015
Location: Upstate NY
Posts: 343
|
I find a soda straw in the spark plug hole works really well to judge what stroke your on as well, you can see it rise all the way to the top on compression and you know your at TDC. Get the flexible end type and bend the top at an angle to prevent it from falling all the way in. The rocker arms should "wiggle" a small amount when you rock them side to side. This is how I check the Guzzi valves without pulling all the rubber plugs to find the index mark.
Shifting to a high gear and using the rear wheel (on a stand) also makes it easy to cycle through strokes. The timing marks also look like a good technique. Here's a good video of how each stroke works for those who are curious or don't know already. |
|
|
|
12-25-2015, 03:54 AM
|
#10 |
|
Join Date: Jul 2008
Location: Idaho
Posts: 25,054
|
Good for you, Sprite.
The next time you will complete the job much faster, since you are now more familiar with the entire procedure.
__________________
Spud "Never argue with an idiot. He will drag you down to his level, and beat you with experience." Mark Twain2015 Zongshen ZS250GY-3 (RX3) 2006 Zongshen ZS200GY-2 (Sierra 200) 2005 Honda XR650L 2004 Honda CRF250X 1998 Kawasaki KDX220 Mods made to my Zongshen ZS200GY-2: http://www.chinariders.net/showthread.php?t=6894 |
|
|
|
12-25-2015, 05:57 PM
|
#11 |

Join Date: Mar 2009
Location: Sardis, BC, Canada
Posts: 25,977
|
I say this with all respect: Atta girl, Sprite! Good for you for jumping in and taking care of it.
__________________
Weldangrind "I figure I'm well-prepared for coping with a bike that comes from the factory with unresolved issues and that rewards the self-reliant owner." - Buccaneer |
|
|
|
04-17-2016, 05:04 PM
|
#13 |

Join Date: Oct 2015
Location: vermont
Posts: 238
|
adj. valves yesterday all went well, took the zong out for 130 miles valve cover on exhaust side was leaking. always carry spare oil got it home o ring looked fine nothing loose cleaned everything up again this time put thin layer of permitex any body else had this problem?
__________________
Peace and Zong Life
|
|
|
|
04-17-2016, 05:45 PM
|
#15 |

Join Date: May 2007
Location: Warshington
Posts: 928
|
And you can't swap intake cover for exhaust cover if memory serves me right. I marked mine before I took them off the first time, always put them back on according to that and they have never leaked. rj
__________________
Live Zong, and Prosper |
|
|
|
|

|
 |
|
|


 Hybrid Mode
