 06-03-2016, 06:52 PM
|
#62 |
Join Date: Mar 2016
Location: Tuscaloosa Al.
Posts: 433
|
I guess CSC changed it. my new manual says check/adjust at 500 and then every 5000 from then on.
__________________
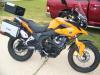
Wingless Hawk, 2016 orange RX3, 97 wide glide,2003 KLR Last edited by Ron B; 06-04-2016 at 10:35 AM. |

|
|
06-03-2016, 07:13 PM
|
#63 | |
|
Join Date: Oct 2015
Location: FL, GA, NC
Posts: 771
|
Quote:
...and I ended up with a damaged camshaft and associated parts.... ....which would have cost me hundreds of $$$ to repair if not for the kindness of CSC. I was advised to check the valve clearances every 2,500 miles. jb
__________________
2016 Honda CB500F......2017 Triumph Street Twin 2014 XT 250........ |
|
|
|
|
06-03-2016, 08:57 PM
|
#64 | |
Join Date: Sep 2014
Location: Arvada, CO
Posts: 1,004
|
Quote:
For myself, I'm going to stick with a 2500 or 3000 mile valve check until I am confident in a longer interval.
__________________
Red 5 standing by! 2015 CSC red RX3 with 19" front wheel, Shinko 804/805, skid plate, tall seat, 13T/45T sprockets, progressive shock, Winyoochanok windshield, GENSSI LED headlight, SW-Motech tankbag, Shorai Lithium battery 2014 Ural Patrol |
|
|
|
|
06-04-2016, 08:31 AM
|
#65 |

Join Date: Feb 2016
Location: Maryland
Posts: 213
|
We'll be doing the 500 mile service today. We'll keep you posted on how it goes. We plan on keeping them at .08 setting, if they have even moved.
Hope you guys have a great Saturday! Pics/video coming later. |
|
|
|
06-04-2016, 11:42 AM
|
#66 | |

Join Date: Mar 2010
Location: Volcano, Ca
Posts: 7,065
|
Quote:
Good luck, take your time and keep some valium on hand. ;-)
__________________
"Light a fire for a man, and you heat him for a day. Light a man on fire, and you heat him for the rest of his life." 2007 Suzuki DRZ400S (SM convert) 2009 Q Link XP 200 1967 BSA B25 250cc Starfire 2022 Royal Enfield Interceptor 650 2023 Royal Enfield Scram 411 1948 Royal Enfield Model G 350 |
|
|
|
|
06-04-2016, 11:51 AM
|
#67 | |

Join Date: Sep 2015
Location: East Central Hellinois
Posts: 1,344
|
Quote:
__________________
************************************************** *** " Time you enjoy wasting, is not wasted." - John Lennon  “I predict future happiness for Americans, if they can prevent the government from wasting the labors of the people under the pretense of taking care of them.” ― Thomas Jefferson "If you don't know where you're going any road will take you there" ....George Harrison song |
|
|
|
|
06-04-2016, 11:52 AM
|
#68 | |
|
Join Date: Sep 2014
Location: Arvada, CO
Posts: 1,004
|
Quote:
__________________
Red 5 standing by! 2015 CSC red RX3 with 19" front wheel, Shinko 804/805, skid plate, tall seat, 13T/45T sprockets, progressive shock, Winyoochanok windshield, GENSSI LED headlight, SW-Motech tankbag, Shorai Lithium battery 2014 Ural Patrol Last edited by detours; 06-04-2016 at 05:28 PM. |
|
|
|
|
06-04-2016, 09:09 PM
|
#69 | |
|
Join Date: Oct 2015
Location: FL, GA, NC
Posts: 771
|
Quote:
jb
__________________
2016 Honda CB500F......2017 Triumph Street Twin 2014 XT 250........ |
|
|
|
|
06-04-2016, 09:21 PM
|
#70 | |
|
Join Date: Sep 2014
Location: Arvada, CO
Posts: 1,004
|
Quote:

__________________
Red 5 standing by! 2015 CSC red RX3 with 19" front wheel, Shinko 804/805, skid plate, tall seat, 13T/45T sprockets, progressive shock, Winyoochanok windshield, GENSSI LED headlight, SW-Motech tankbag, Shorai Lithium battery 2014 Ural Patrol |
|
|
|
|
06-04-2016, 10:12 PM
|
#71 |
|
Join Date: Feb 2016
Location: Maryland
Posts: 213
|
QUICK UPDATE-
Got the job done. I'll post pics in the morning. I'm too damn tired.  We have to do the damn valve adjustment again tomorrow. Only this time, I know it won't take 5 hours! I kept telling my husband .08mm. Turns out his filler gauges are in INCHES and we ended up setting the valves to .008in!!!!! We have to do the damn valve adjustment again tomorrow. Only this time, I know it won't take 5 hours! I kept telling my husband .08mm. Turns out his filler gauges are in INCHES and we ended up setting the valves to .008in!!!!!    BE SURE you are doing 'milimeters' ...if you are doin it in "inches" or SAE, be sure it is .003 inches. That equates to .08mm. Live and learn. Thank God we didn't run the bike long. The tapping was so loud you heard it over the exhaust. I bought a newer filler gauge!
|
|
|
|
06-04-2016, 10:20 PM
|
#72 | |

Join Date: Feb 2016
Location: George West, Texas
Posts: 4,097
|
Quote:
Practice makes perfect
__________________
***************************************** 2015 Bashan"Blaze" BS250GY-31 (DB-07K-250) GONE 2017 Suzuki V Strom 650 XT "We are all born ignorant, but one must work hard to remain stupid." ~Benjamin Franklin~
|
|
|
|
|
06-11-2016, 10:32 PM
|
#73 |

Join Date: Aug 2015
Location: Upstate NY
Posts: 343
|
I did my second adjustment today (3000 miles on the bike) and all of them were at .03-4mm. I adjusted everything to .08mm and I'll check again at 6000. I'm not confident in the 5000 mile interval just yet. It's back to happy-tappy and just about ready for a 3000 mile ride.
By the way the method of lining up the two cam sprocket markers and the index line make things quite a bit easier and foolproof when setting TDC. |
|
|
|
06-12-2016, 12:11 PM
|
#74 |

Join Date: Feb 2016
Location: SC, USA
Posts: 46
|
Did my first adjustment today at 2000 mi. Intake valves were still .08mm, exhaust weren't bad at .04 and .05, but I got them back to .08.
Fairings, gas tank, took me about 25 minutes. Next most annoying thing was when I was going to take the crank cover off, that dribbled a little oil which was fine...then I opened the front view port and oil gushed out - I quickly closed it. For some reason no one's ever noted this would be an issue. I know it'd be fine with a center stand. I found TDC without the viewport anyway through spark plug hole and a thin screw driver - and obviously the L&R cam chain covers. Overall it was a lot easier than I expected and would probably take 2-3 hrs next time.
__________________
'16 Red RX3, K270's, 13t Front, Fog lights, Tusk Bar Risers (4K mi.) '82 Suzuki SP250 (11k Miles) '85 Honda Rebel 250 (Sold April 2016) |
|
|
|
06-12-2016, 12:39 PM
|
#75 |
|
Join Date: Aug 2015
Location: Upstate NY
Posts: 343
|
Nice work on the valve check, you basically just tackled the hardest part of routine maintenance on a bike.
Those exhaust valves would be far easier if that metal bar wasn't right in the way! I wish that had another bolt on the other end you it could be easily removed and out of the way, then the check would be far easier. I prop the tank up like so to save the trouble of removing it. Run it near empty or you'll get some spillage from the breather tube.  
|
|
|
|
|

|
 |
|
|


 Linear Mode

