 06-05-2010, 09:26 PM
|
#16 |
|
Join Date: May 2010
Posts: 16
|
Long, but I highly recommend reading it all.
I purchased a Chinese (SunL SLA-200KS) for $75 a week or so ago. When I engaged reverse it would clunk and shudder but not actually go backwards. I tried forcing the engagement arm backwards, but not even that worked. So, I took the entire assembly apart and learned how it worked, and I also learned some very useful things, and found the problem (s) preventing it from fully engaging in reverse. Before I go any further, I have to say the design is actually ingenious, and if you follow the steps I will point out, can be a bullet proof axle w/ reverse. First we have the meshing spider gear assembly removed so that I can show you what happens inside of the axle when reverse is engaged. Please understand I only have a 2 megapixel camera on a cell phone, so I cannot capture much needed details. You will have to try to visualize some things. Have a look: 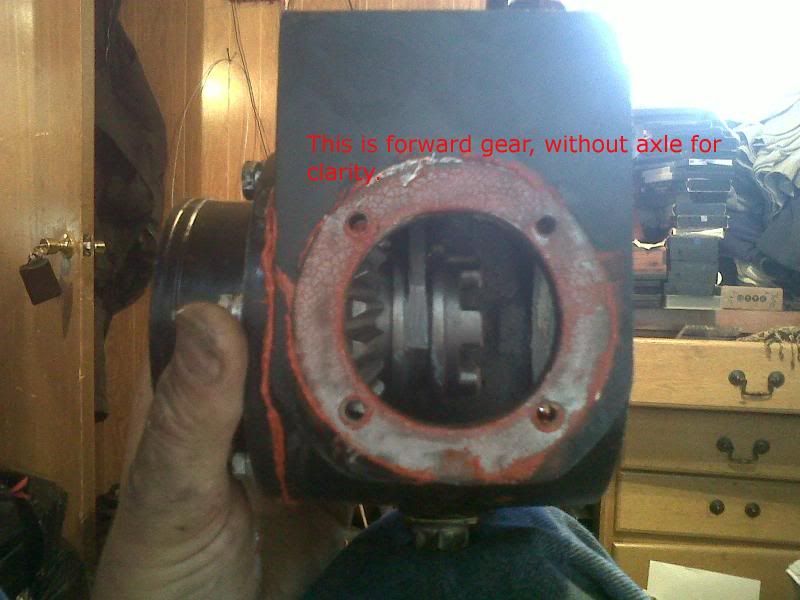 Look inside the gearbox. This is the forward position. Look at the object to the right that sort of looks like it has a castle top on it, facing right. This is the engagement pawl. In the middle of it is a long metal arm, this is the engagement dog. If this is confusing, just keep reading. I will go into more detail. 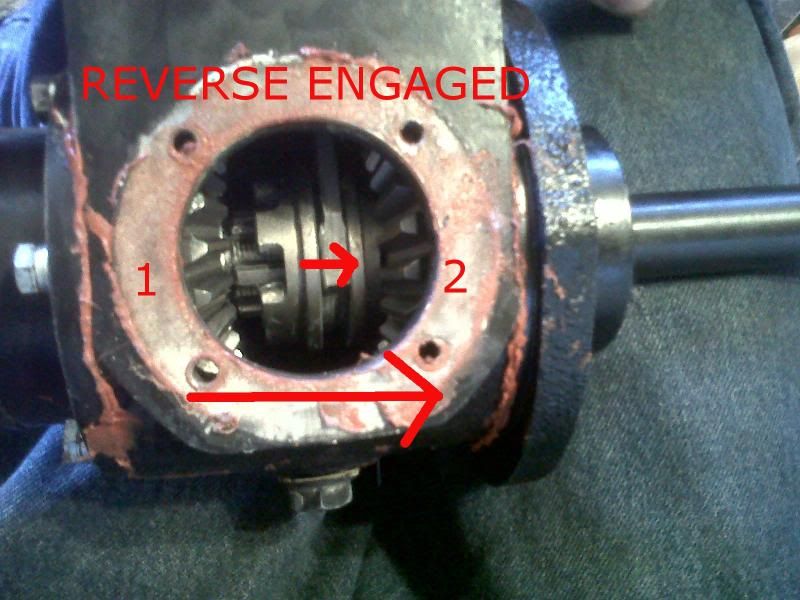 Above you will see the axle in the reverse position. Notice how the engagement pawl is now in the right hand position, and is away from the forward spider gear. In this picture, I have inserted the axle, and you can see the long axle splines between the engagement pawl (Small arrow) and the forward spider gear (1). Now, the engagement pawl is to the right, and is meshing with the reverse spider gear (2). 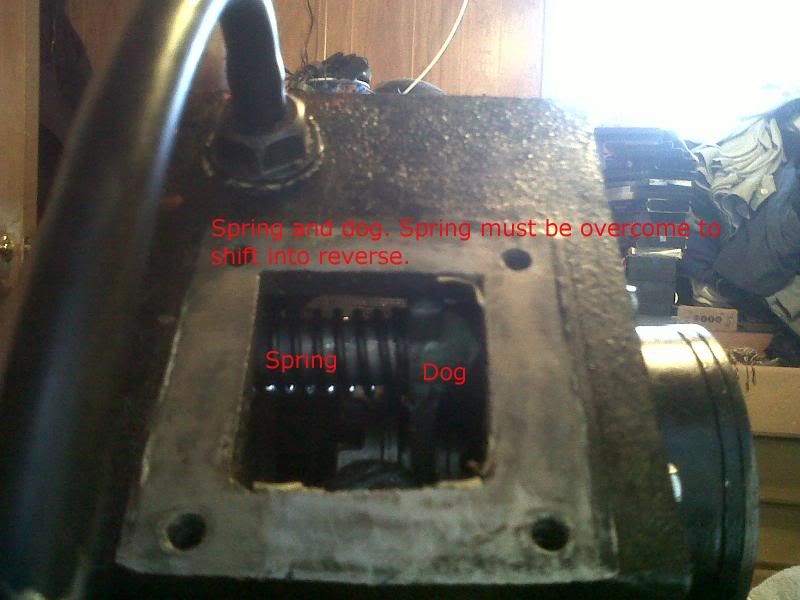 Next is a look inside the gearbox via the shift lever cover. Here you can partially see the dog, and the forward thrust spring. The spring acts as a failsafe to ensure full engagement of the forward gear when tension is released from the shift lever. If this spring is not fully overcome, the axle will not fully be in reverse. (This is bad and can result in damage. There's also no way to know if it is doing this unless you remove the reverse spider meshing gear assembly [4 bolts]). 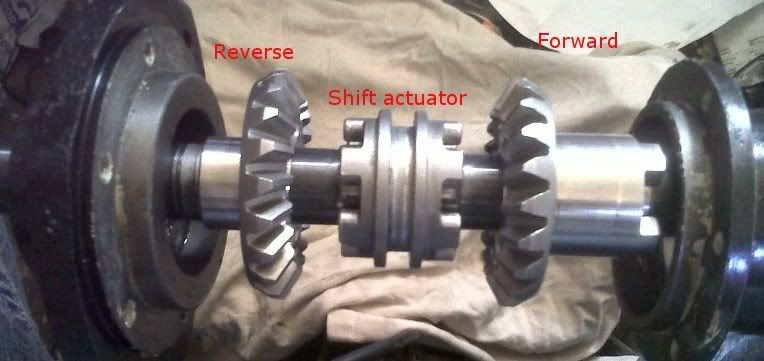 Here's a better picture of the assembly. You can clearly see the shift actuator, forward and reverse gears and bearing housings, and the axle. Understanding these things is vital. Look at the protrusions coming out of the shift actuator. Those protrusions are what transfers power from the sprocket to the axle. Look at the forward gear-those 4 protrusions are what meshes with the sprocket assembly. 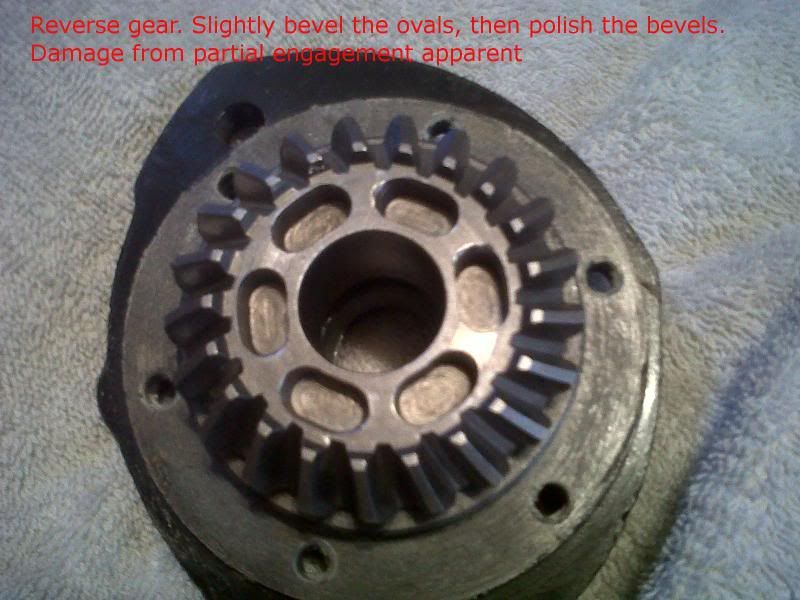 Take a look at the reverse gear. Look at the upper right hand oval-see how it is beveled? I didn't do that-the engagement actuator was only partially engaging which resulted in metal chunks being broke off. This is why I say, unless you follow my steps, you will never be fully sure your unit is working right, and the first clunk you hear and feel might be the last that axle will make. Luckily I didn't continue to push my axle when it didn't go into reverse. 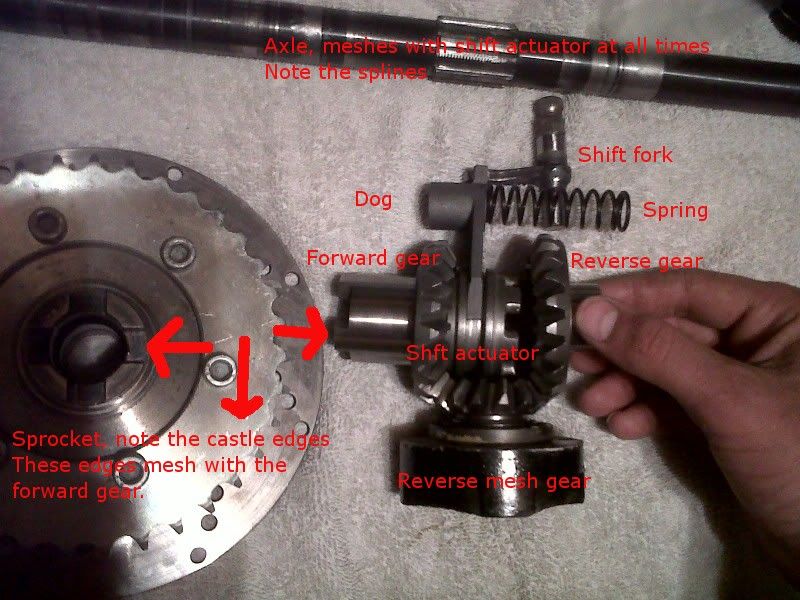 Here I am trying to illustrate what goes on inside the gearbox. Look at the top, at the axle, see those long splines-those mesh internally with the shift actuator, so the shift actuator is constantly connected to the axle. That means that whatever is connected to the shift actuator is going to turn the axle, then the hubs, then the wheels. Look at the forward gear. (To the left) and the sprocket. See the splines on the sprocket that mesh with the forward gear. The power is transferred from the chain, to the sprocket, to the forward gear, to the shift actuator, then finally to the axle. Does that make sense? That means whichever direction the sprocket is turning is the direction the axle will turn. 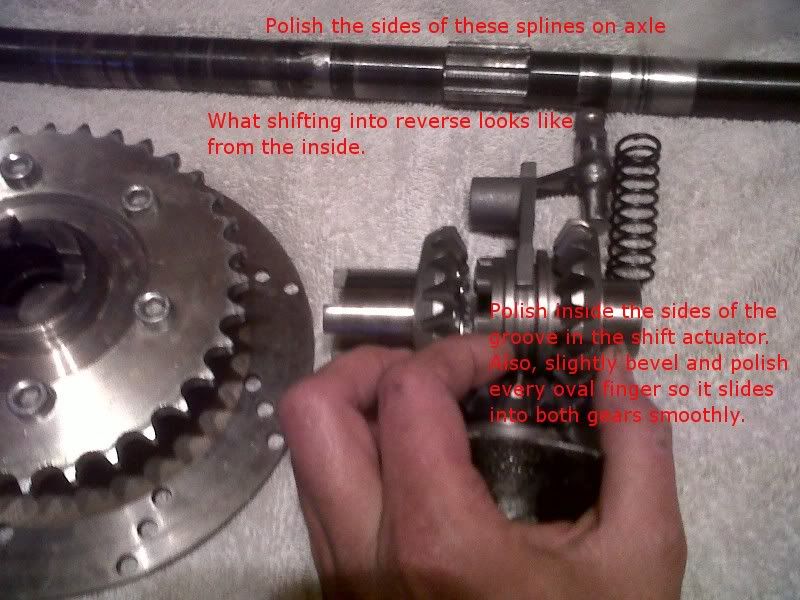 Same as above, but now reverse. Instead of the power being transferred to the forward gear directly, now the path of power follows a different route. Take note of the spider gears. The power goes from the forward gear, to the spider meshing gear (Obscured by my hand, see 2 pics above) then to the reverse gear, which is now connected to the engagement actuator, which is connected to the axle. So, when the sprocket is going clockwise, because the spider gears are being used, the rotation is reverse, or the axle will now be going counter-clockwise (Or anti-clockwise if you have an English accent). If you are watching the assembly internally, the forward gear will be spinning the opposite direction of the reverse gear thanks to the meshing spider gear. Take your time and digest that. Pretty good idea, huh? 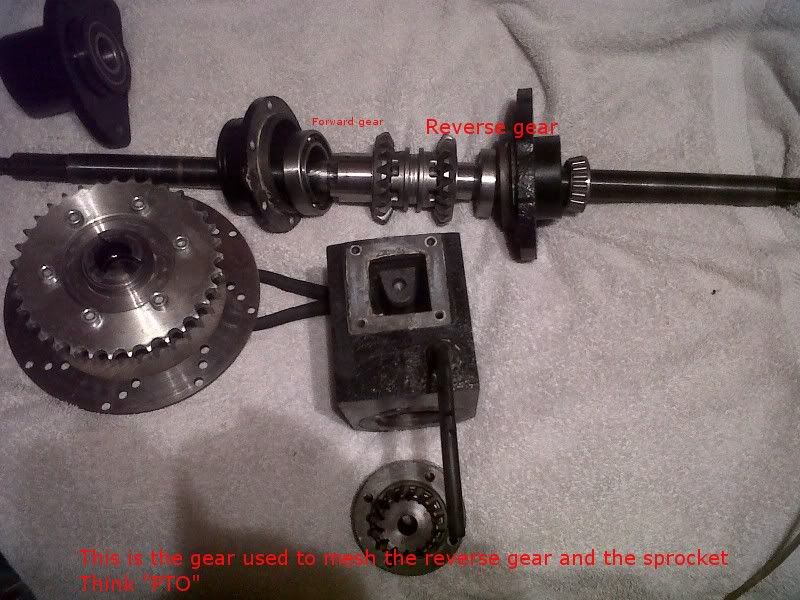 Here's a rough pic showing the reverse meshing spider gear. When I first saw it, I thought "This is where the PTO goes!" For those of you who aren't farmers, it stands for "Power take off" or "Power transfer output" which can be used to run a generator, a combine, a pump, anything that needs a rotating input. Technically, if you wanted to, you could machine a new cover with an oil seal, and weld a splined output that could be used as a PTO. It's not as farfetched as you might think, although running an emergency generator from your quad would be a sight. OK, now that you understand how it works, we need to break out the polishing bits on our Dremels. I am not talking about the felt and rouge bit, but the superfine abrasive bit.  I used a moderate abrasive bit to reshape the ovals in both forward and reverse gears, then the polishing bit to polish them to a shine. I not only did the edges of the ovals, but the straight portions to-just in case there is slop between the axle and the shift actuator. Next, I did the same thing to the shift actuator. I slightly beveled each of the oval engagement fingers, then polished them. I also polished the track in the middle of the shift actuator that the dog rides in. Then, I polished the shift fork. There are 3 places on the shift fork that need a good polishing. The area directly under the splines. The lower protrusion that goes inside the gearbox housing, and the area where the arm contacts the dog. All of these areas were appallingly rough, like sandpaper. I also polished the inside ring on the shift lever cover plate, and the hole inside the gearbox that the lower shift lever rides in. For such a well designed assembly, they were put together in a hurry, and almost no finishing was done. Every rough surface is friction that will make proper shifting more and more difficult. Polish the inside of the shift dog bushing (The hole), and each side of the two forks. See the bar-the shift dog rides on that bar. When I took my axle apart, less than a cup of black, molasses oil came out. This lack of lubrication took its toll. The bar had a deep groove in it. This is eighty five percent of my reverse shifting difficulties. That's 85%! The dog would ride in the groove and never fully slide to fully engage the reverse gear. I polished the groove well, but the only way to fix it without buying a new one is simple: Put the bar in backwards. So that the dog will ride on the unused portion, the portion without the deep groove. I would venture a guess and say that if you have never changed the oil in your gearbox, your bar is going to have a groove worn into it. I also polished the sides of the splines on the axle. You have to think if the shift actuator is under any pressure-what parts will have friction? Finally, I need to show everyone what I mean by rough finishes. 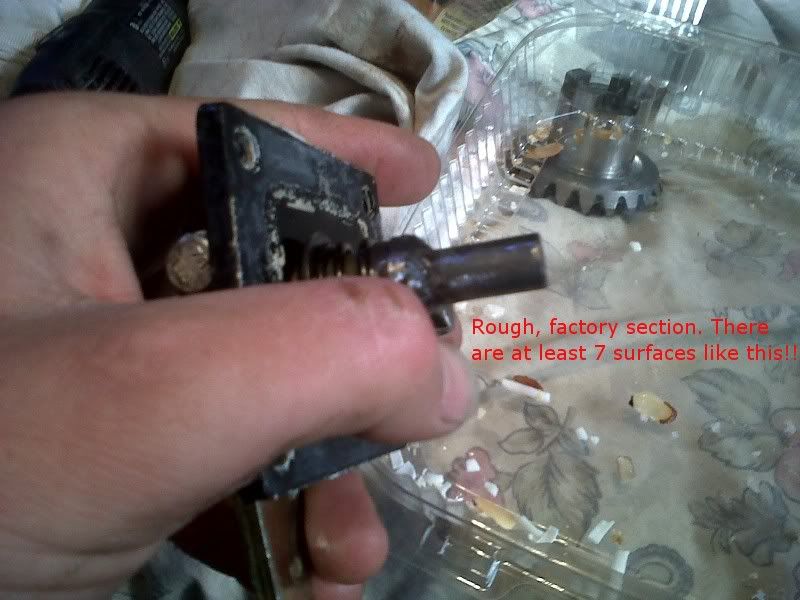 No, it's not the lighting, that surface was actually that rough. Now, the polished section: 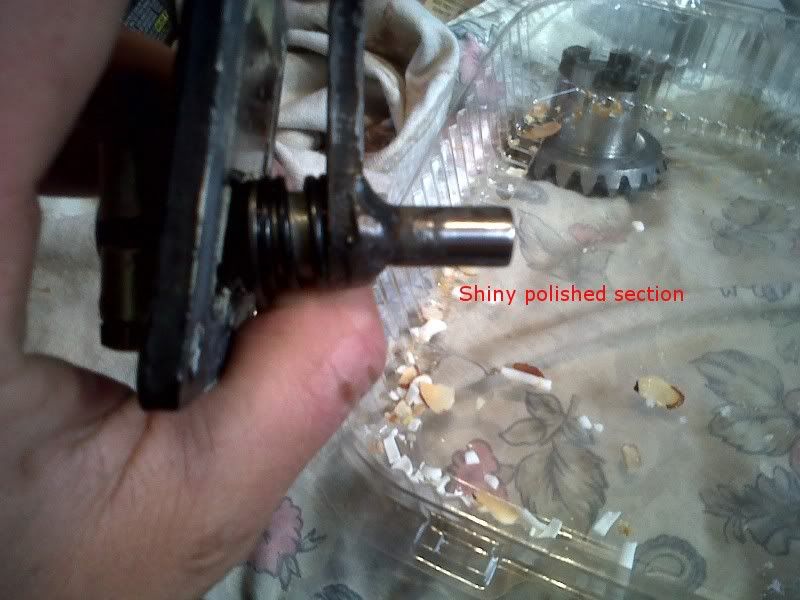 Look at the shiny part. It only takes a few seconds with the right bit to make it that shiny. Finally, I also upgraded the shift spring. My external shift spring looked stretched-out. So, I bought one that was the same length, but larger diameter with a thicker wire. I am very satisfied with the performance of the reverse gear, although it does hop sometimes when I am going reverse uphill, but that is more due to traction than the gearbox. One of the most important things to remember after you get done doing these things is NEVER, EVER shift into reverse, or from reverse to forward, and just let the clutch out and go. I know you just want to get going, but take a brief second, and rock your ATV a little until you hear the actuator hit home in either the forward or reverse gears. You could take off partially engaged which could result in a broken gearbox. To really test my reverse, I took my quad up this incline backwards, for 1/4 mile. It made it up great, until I hit a wash and got pulled off the side of the road. I know it looks really steep, and that is because it is. I started off at the mine, and rode all the way up to within 15 feet of where the camera is. I did this because I can trust my reverse gear. 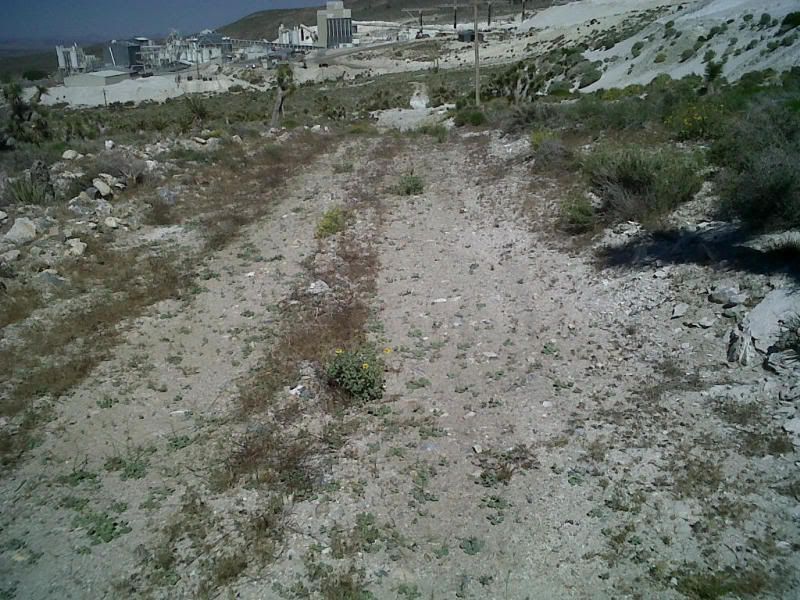 If you are wondering what oil I put in and how much, I used 1/2 Lucas oil stabilizer and 1/2 Mobile-1 full synthetic 75-90W gear oil for differentials. How much did I put in? To the top of the inlet, whish is 100%. I realize halfway is probably right, but I needed to make sure that the thrust bearings had oil. They are sandwiched in between two sealed bearings, and the oil they get is trapped there until it is spun out. So you absolutely need oil to be pretty high. So far no oil has leaked out of the overflow tube. I sealed the assembly up with Silicone, after cleaning off the white gunk they used to seal the assembly, with a polishing bit. I also criss-crossed the bolts holding the axle hubs together to prevent stress cracking. If there are any questions, go ahead and post them here. In my opinion, everyone who has this axle absolutely has to do what I have outlined here if they wish to keep their reverse feature. |

|
|
06-06-2010, 12:46 PM
|
#17 |

Join Date: Mar 2009
Location: Sardis, BC, Canada
Posts: 25,977
|
That's an excellent writeup wolfmangk. Thanks for taking the time to photograph everything, and to edit the photos with text. I hope your wife forgives you for working on the tablecloth.
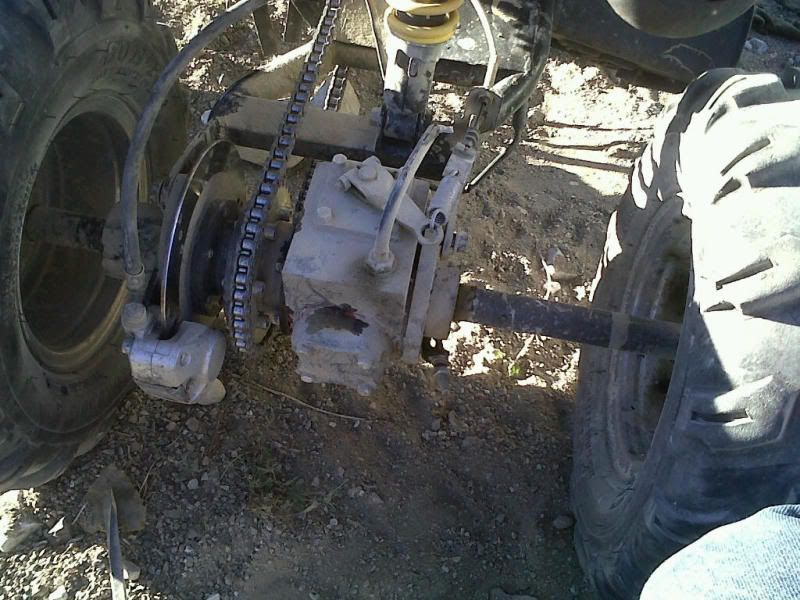
 I need to see a photo of the rear axle mounted in your ATV; you have mentioned a clutch, which tells me that you have this axle connected to a conventional unit motor. If that's the case, I suspect that mine is upside down compared to yours. I agree, this axle is ingenious! I haven't figured out where it was originally used, but I'm sure that the design is American. It's so odd to watch the chain moving forward while the axle is in reverse. When I have some time, I'll dismantle our rear axle and polish all of the mating surfaces, but ours is working very smoothly so far with synthetic gear oil. I never ran it with the factory molasses.
__________________
Weldangrind "I figure I'm well-prepared for coping with a bike that comes from the factory with unresolved issues and that rewards the self-reliant owner." - Buccaneer |
|
|
|
06-08-2010, 10:22 PM
|
#18 |
|
Join Date: May 2010
Posts: 16
|
Can't you tell by my filthy bachelor room? I'm single! God has not yet blessed me with a mate. When I am ready, friend, when I am ready!!
 You are right, mine is upside-down, which means that except for splash lubrication, my shift bar isn't getting any oil, normally. Bad when you shift into reverse without having gone anywhere in the morning. Today I was helping a hazmat team clean up about 200 gallons of spilled used motor oil, and I used this quad to haul full 5 gallon buckets of dirt and rock. Weighed down and over difficult and steep terrain, I had about 80 forward/reverse operations. Whenever I shifted from one to the other, I briefly and gently let out the clutch until I heard the rearend shift. Then, I pulled the clutch all the way in to remove tension on the shift mechanism, then released it fully and went on my way. This was very successful. However, towards the end it began to be difficult with me, but it cleared up and out of all of the shifts, only 3 were difficult. When I checked the level, it was about 4/5 full, the rest had leaked out past the worn out seals and the axle tubes, mainly the right hand side tube (Longer one). Nothing out of the overflow tube, not a drop. I refilled it to the top and will continue to do so. I used Green Grease as assembly lube, I feel it is possible some of my difficulties was from the Green Grease being eroded away. If the shift bar wears excessively I will be forced to find a new one, which won't be too hard to do. |
|
|
|
06-10-2010, 11:22 PM
|
#19 |
|
Join Date: May 2010
Posts: 16
|
OK so I was curious to see how much splash was going on inside the axle because the bar that the shift dog slides on absolutely needs lubrication.
So I put it in 5th gear and let it idle, took the fill cap off, and looked inside. Turns out, almost zero splash, an even when riding, I would bet, not enough. I need to replace one of the seals, which I might do soon, and that should help with the oil leaking out. I don't know if this video will work, but here is the link. Tell me if it doesn't work and I will try again.  Oh, and I realize my pantleg is very close to the spinning wheel, what can I say, I like to live on the edge, baby. |
|
|
|
06-11-2010, 12:51 PM
|
#20 |
|
Join Date: Mar 2009
Location: Sardis, BC, Canada
Posts: 25,977
|
Thanks for the video.
The part that you call a shift dog (which I call a shift fork) is running on the shift acuator that is spinning with the rear axle. I'd be inclined to believe that the actuator is contacting the oil, and oil is clinging to the groove and lubricating the shift fork. I think you previously identified that if you fill it to the top, it will come out of the overflow during a ride. When I face these situations, I remember that two stroke main bearings live at 40:1 or even 50:1 at crazy revs. That's very little oil to keep a roller bearing alive, yet it works. Once again, I'm very grateful for your detailed photos and posts. 
__________________
Weldangrind "I figure I'm well-prepared for coping with a bike that comes from the factory with unresolved issues and that rewards the self-reliant owner." - Buccaneer |
|
|
|
02-07-2011, 02:11 PM
|
#21 |
|
Join Date: Jan 2011
Location: Chilliwack, B.C., Canada eh
Posts: 1,393
|
we too are looking to keep an eye on this as this is the same rear end in the wifes 150 tao tao and want to know what to look for and how to maintain.
|
|
|
|
02-07-2011, 02:27 PM
|
#22 |
|
Join Date: Mar 2009
Location: Sardis, BC, Canada
Posts: 25,977
|
Take the time to read this thread from the beginning, and use quality gear oil in the housing. I'm using Castrol Syntec 75W90.
__________________
Weldangrind "I figure I'm well-prepared for coping with a bike that comes from the factory with unresolved issues and that rewards the self-reliant owner." - Buccaneer |
|
|
|
02-07-2011, 03:09 PM
|
#23 | |
|
Join Date: Aug 2010
Location: austin, tx
Posts: 1,452
|
Quote:
and i 2nd the use of quality motor oil and gear oil..
__________________
200cc beast replica,carsoli cdi,performance coil,fmf powercore 2,uni air filter,hour/tach meter,jetted mikuni carb,msr bars,moose racing grips,yz250f clutch perch,D.I.D chain |
|
|
|
|
|

|
 |
|
|


 Linear Mode

