|
|
 08-17-2015, 01:00 AM
|
#1 |

Join Date: Sep 2014
Location: Arvada, CO
Posts: 1,004
|
How to install your 13T sprocket
I installed my 13T countershaft sprocket today, replacing the stock 14T sprocket. This is a great way to widen the powerband of the engine and make your gearing more usable, especially on hills. It also gives you a usable 6th gear.
The swap was very easy, even though I had never done it before. Tools Needed
__________________
Red 5 standing by! 2015 CSC red RX3 with 19" front wheel, Shinko 804/805, skid plate, tall seat, 13T/45T sprockets, progressive shock, Winyoochanok windshield, GENSSI LED headlight, SW-Motech tankbag, Shorai Lithium battery 2014 Ural Patrol Last edited by detours; 08-17-2015 at 02:37 AM. |

|
|
08-17-2015, 01:03 AM
|
#2 |
|
Join Date: Sep 2014
Location: Arvada, CO
Posts: 1,004
|
First, lift the rear tire using a paddock stand or centerstand. This paddock stand from Harbor Freight was cheap and works great.
You can do the whole job on the side stand if you want, but this will give you a little more room, while keeping the bike very stable.
__________________
Red 5 standing by! 2015 CSC red RX3 with 19" front wheel, Shinko 804/805, skid plate, tall seat, 13T/45T sprockets, progressive shock, Winyoochanok windshield, GENSSI LED headlight, SW-Motech tankbag, Shorai Lithium battery 2014 Ural Patrol Last edited by detours; 08-17-2015 at 02:21 AM. |
|
|
|
08-17-2015, 01:05 AM
|
#3 |
|
Join Date: Sep 2014
Location: Arvada, CO
Posts: 1,004
|
Remove the countershaft sprocket cover on the left side of the bike by removing two 8mm bolts.
__________________
Red 5 standing by! 2015 CSC red RX3 with 19" front wheel, Shinko 804/805, skid plate, tall seat, 13T/45T sprockets, progressive shock, Winyoochanok windshield, GENSSI LED headlight, SW-Motech tankbag, Shorai Lithium battery 2014 Ural Patrol |
|
|
|
08-17-2015, 01:13 AM
|
#4 |
|
Join Date: Sep 2014
Location: Arvada, CO
Posts: 1,004
|
The countershaft sprocket is secured by a 30mm nut. The nut has a safety washer bent over one edge.
Using a large flat-bladed screwdriver, bend the safety washer until it is nearly flat. You can use a socket extension or other blunt tool to flatten it, but be careful not to damage the washer. You need to reuse it to install your new sprocket.
__________________
Red 5 standing by! 2015 CSC red RX3 with 19" front wheel, Shinko 804/805, skid plate, tall seat, 13T/45T sprockets, progressive shock, Winyoochanok windshield, GENSSI LED headlight, SW-Motech tankbag, Shorai Lithium battery 2014 Ural Patrol |
|
|
|
08-17-2015, 01:16 AM
|
#5 |
|
Join Date: Sep 2014
Location: Arvada, CO
Posts: 1,004
|
Make sure the bike is in gear. If in neutral, you will just turn the wheel.
Using a 30mm socket wrench with a short extension, remove the countershaft sprocket retaining nut. Then remove the safety washer.
__________________
Red 5 standing by! 2015 CSC red RX3 with 19" front wheel, Shinko 804/805, skid plate, tall seat, 13T/45T sprockets, progressive shock, Winyoochanok windshield, GENSSI LED headlight, SW-Motech tankbag, Shorai Lithium battery 2014 Ural Patrol |
|
|
|
08-17-2015, 01:20 AM
|
#6 |
|
Join Date: Sep 2014
Location: Arvada, CO
Posts: 1,004
|
Gently pull the sprocket and chain off the countershaft spindle. It should slide easy away from the engine.
Once it's off the spindle, hold the chain above the sprocket to create slack and gently work the sprocket out of the chain. There should be room to remove it without removing the chain guard or moving the rear wheel.
__________________
Red 5 standing by! 2015 CSC red RX3 with 19" front wheel, Shinko 804/805, skid plate, tall seat, 13T/45T sprockets, progressive shock, Winyoochanok windshield, GENSSI LED headlight, SW-Motech tankbag, Shorai Lithium battery 2014 Ural Patrol Last edited by detours; 08-17-2015 at 02:27 AM. |
|
|
|
08-17-2015, 02:42 AM
|
#7 |

Join Date: Jul 2008
Location: Idaho
Posts: 25,054
|
Thanks for posting the nice tutorial and excellent photos.
 It is safe to bend each tab of the safety washer twice. However, if you bend either tab a third time, you risk losing the 30mm nut which holds the sprocket to the counter shaft (C/S).  Therefore, I don't recommend using the same safety washer more than 4 times. Therefore, I don't recommend using the same safety washer more than 4 times. 
__________________
Spud "Never argue with an idiot. He will drag you down to his level, and beat you with experience." Mark Twain2015 Zongshen ZS250GY-3 (RX3) 2006 Zongshen ZS200GY-2 (Sierra 200) 2005 Honda XR650L 2004 Honda CRF250X 1998 Kawasaki KDX220 Mods made to my Zongshen ZS200GY-2: http://www.chinariders.net/showthread.php?t=6894 |
|
|
|
08-17-2015, 02:55 AM
|
#8 |
|
Join Date: Sep 2014
Location: Arvada, CO
Posts: 1,004
|
Thanks! Let me know if you have any corrections or recommendations and I'll gladly update the instructions.
This might be a good page to link from the Maintenance sticky.
__________________
Red 5 standing by! 2015 CSC red RX3 with 19" front wheel, Shinko 804/805, skid plate, tall seat, 13T/45T sprockets, progressive shock, Winyoochanok windshield, GENSSI LED headlight, SW-Motech tankbag, Shorai Lithium battery 2014 Ural Patrol |
|
|
|
08-18-2015, 12:40 PM
|
#9 |
|
Join Date: Jul 2008
Location: Idaho
Posts: 25,054
|
Detours,
Thanks for posting this fine tutorial, and taking the time to document your work with such excellent photographs. I have added this thread to the RX3 Tech Sticky, under the Maintenance subheading.  The RX3 Tech Sticky is permanently pinned to the top of this forum. http://www.chinariders.net/showthread.php?t=14228
__________________
Spud "Never argue with an idiot. He will drag you down to his level, and beat you with experience." Mark Twain2015 Zongshen ZS250GY-3 (RX3) 2006 Zongshen ZS200GY-2 (Sierra 200) 2005 Honda XR650L 2004 Honda CRF250X 1998 Kawasaki KDX220 Mods made to my Zongshen ZS200GY-2: http://www.chinariders.net/showthread.php?t=6894 |
|
|
|
08-23-2015, 01:13 AM
|
#10 |

Join Date: Jul 2015
Location: Milpitas, CA. USA
Posts: 775
|
Detours & Spud, thank you both for elaborating the procedure for those new to wrenching.
Am I seeing a 15 tooth in your pic, Spud? That's what I want to try for my freeway flyer commuter to bring the 6th gear revs down. Is that a Suz part or aftermarket part for the DRZ? Also, good point to measure from swing arm pivot to axle center, as the marks for the adjustors may not be accurate. Once I've determined their accuracy, I know if I can rely on them for adjustment on the road. If you are able to torque the sprocket nut to 100 ft/lbs, it should not loosen up for a very long time, if ever. Best way I've found to achieve that is to hold the rear brake on while taking the nut to final torque value. A click type wrench is best for that, since trying to read a beam scale while bent over the seat & holding the brake on is an advanced Yoga skill. Happy wrenching, Jay. |
|
|
|
08-23-2015, 01:33 AM
|
#11 | |
|
Join Date: Jul 2008
Location: Idaho
Posts: 25,054
|
Quote:
The sprocket in the second photo is a Primary Drive, 15T C/S sprocket sold by Rocky Mountain ATV/MC.The Suzuki C/S sprocket is very close to the Zongshen sprocket, but I would not recommend using the Suzuki sprocket. Close is good for horseshoes and hand grenades. However, close isn't good enough for C/S sprockets.  Here are the dimensions for the Suzuki C/S sprocket.  In contrast, I have measured the Zongshen sprocket and recorded the following values. Minimum spline diameter: 19 mm Maximum spline diameter: 22 mm Thickness: 11 mm Using the Suzuki C/S sprocket might strip the counter shaft splines. Proper C/S sprockets for the RX3 are readily available from CSC for reasonable prices. Therefore, I think it is unwise to risk damage to the bike's countershaft by using the Suzuki sprockets. However, the Suzuki safety washer might work well enough, if you are ever caught shorthanded.
__________________
Spud "Never argue with an idiot. He will drag you down to his level, and beat you with experience." Mark Twain2015 Zongshen ZS250GY-3 (RX3) 2006 Zongshen ZS200GY-2 (Sierra 200) 2005 Honda XR650L 2004 Honda CRF250X 1998 Kawasaki KDX220 Mods made to my Zongshen ZS200GY-2: http://www.chinariders.net/showthread.php?t=6894 |
|
|
|
|
08-23-2015, 01:49 AM
|
#12 |
|
Join Date: Jul 2015
Location: Milpitas, CA. USA
Posts: 775
|
Thanks for the clarification and dimensions, Spud.
Agreed that close enough isn't good. |
|
|
|
08-17-2015, 02:59 AM
|
#13 |
|
Join Date: Jul 2008
Location: Idaho
Posts: 25,054
|
Indeed, it is important to verify the rear axle is the same distance from the swingarm bolt on each side of the motorcycle. Otherwise, the rear wheel will be canted. The canted wheel will accelerate wear of both sprockets, the drive chain, and the rear tire. In addition, the canted wheel will rob power from the engine.
After removing the plastic cap covering the swingarm bolt, I use a tape measure to determine the distance from the center of the swingarm bolt to the center of the axle on each side of the motorcycle. If the two distances are not the same, I tighten/loosen the axle adjusting nuts until the two measurements match. The rear axle is now parallel to the swingarm bolt, and the rear wheel is not canted. After aligning the rear axle with the swingarm bolt, I once again check the slack in the drive chain. If the slack needs to be adjusted, I tighten/loosen each axle adjusting nut the same amount on both sides of the wheel. Since the nuts are hexagons, I measure the adjustments in 1/6 turns of the nut. For example, I might tighten each nut 2/6 turns, then check the drive train slack. I continue this process until I achieve the proper drive chain slack.If you turn each axle adjusting nut the same amount every time you adjust the slack in the drive chain, you will maintain the proper, parallel orientation of the rear axle and the swingarm bolt.
__________________
Spud "Never argue with an idiot. He will drag you down to his level, and beat you with experience." Mark Twain2015 Zongshen ZS250GY-3 (RX3) 2006 Zongshen ZS200GY-2 (Sierra 200) 2005 Honda XR650L 2004 Honda CRF250X 1998 Kawasaki KDX220 Mods made to my Zongshen ZS200GY-2: http://www.chinariders.net/showthread.php?t=6894 |
|
|
|
08-17-2015, 03:37 AM
|
#14 |
|
Join Date: Jul 2008
Location: Idaho
Posts: 25,054
|
Since you should only use the safety washer four times before replacement, it is wise to keep a small supply of spare safety washers. These washers only cost $0.88 apiece. I need to remember to order some of these safety washers the next time I get parts from CSC.
The CSC part number for these safety washers is Z20-113.The Suzuki DRZ400S/DRZ400E motorcycles also use a counter shaft with very similar, or identical dimensions. These bikes also use a 30mm nut to secure the C/S sprocket to the counter shaft. Therefore, if you are in a pinch, you can also use the Suzuki safety washer designed for these motorcycles. The safety washer has Suzuki part #09167-22012.The Suzuki safety washer is held in place by the splines of the counter shaft. 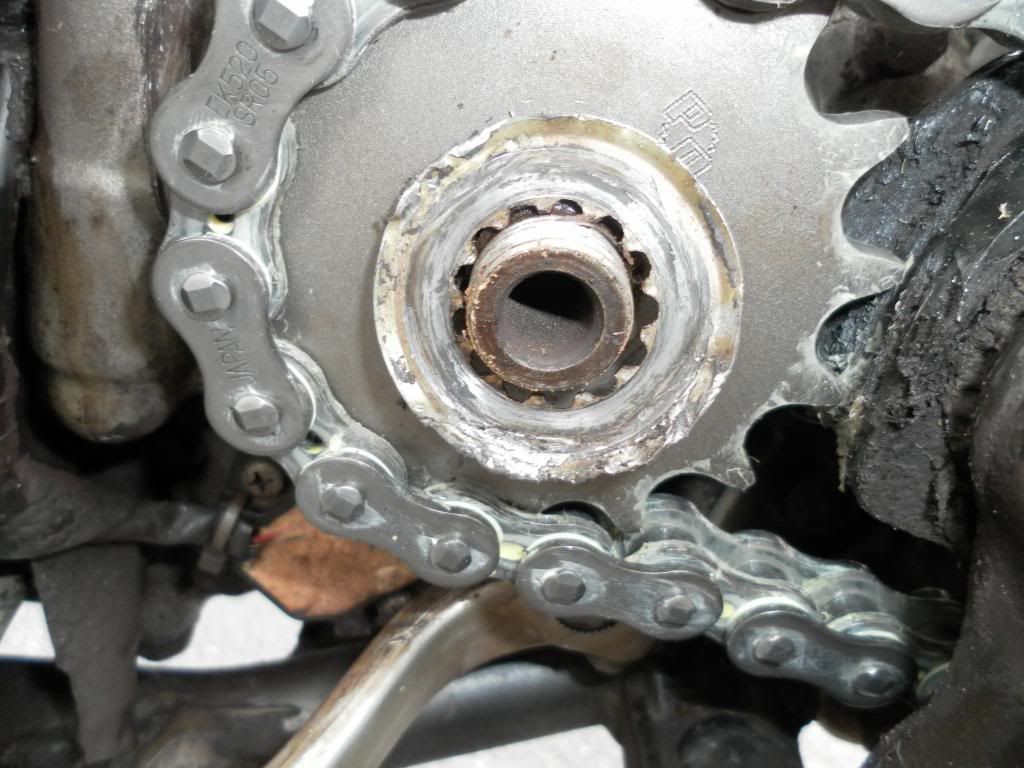 After placing the 30mm nut over the washer, bend part of the washer over one side of the nut with a pair of pliers. 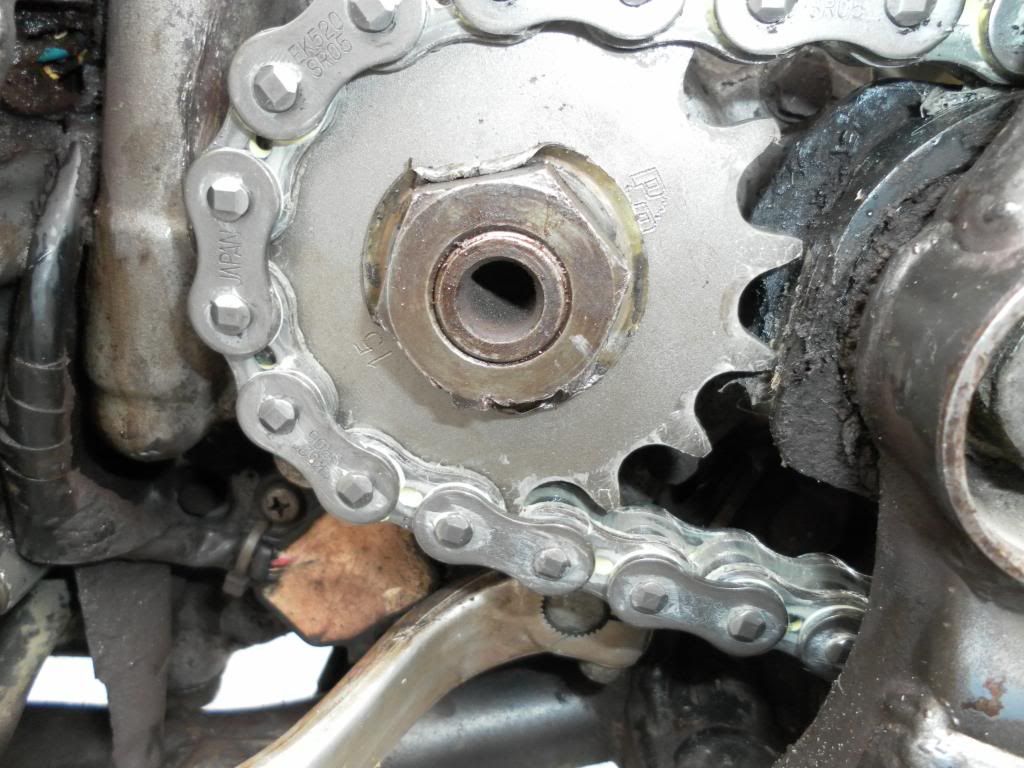
__________________
Spud "Never argue with an idiot. He will drag you down to his level, and beat you with experience." Mark Twain2015 Zongshen ZS250GY-3 (RX3) 2006 Zongshen ZS200GY-2 (Sierra 200) 2005 Honda XR650L 2004 Honda CRF250X 1998 Kawasaki KDX220 Mods made to my Zongshen ZS200GY-2: http://www.chinariders.net/showthread.php?t=6894 |
|
|
|
|

|
 |
|
|


 Hybrid Mode
